
Season 2 War Guide시즌2 전쟁 가이드
By Hugh Jaynass · T1ER Iron Resolve · Server #2211
Everything you need for the Rare Soil War and the Season 2 cold, in plain English. Read it once before Week 4, then keep it handy on battle days.
광물쟁탈전과 시즌2 추위에 필요한 내용을 쉽게 정리했습니다. 4주차 전에 한 번 읽고, 전투 날에 다시 확인하세요.
Confirmed seen on #2211 or confirmed by leadership. Working guides say so; we'll confirm once battles start. Terms are explained in the list at the bottom.
Confirmed #2211에서 확인됨. Working 가이드 기준, 전투 시작 후 확인 예정. 용어는 아래 목록에 정리했습니다.
Rare Soil 101신비한 광물 기본
WorkingSeason 2 comes down to one resource: Rare Soil. You collect it for three weeks, then you fight over it.
시즌2의 핵심은 신비한 광물 하나입니다. 3주 동안 모으고, 그다음엔 그걸 두고 싸웁니다.
Weeks 1 to 3: collect1~3주차: 모으기
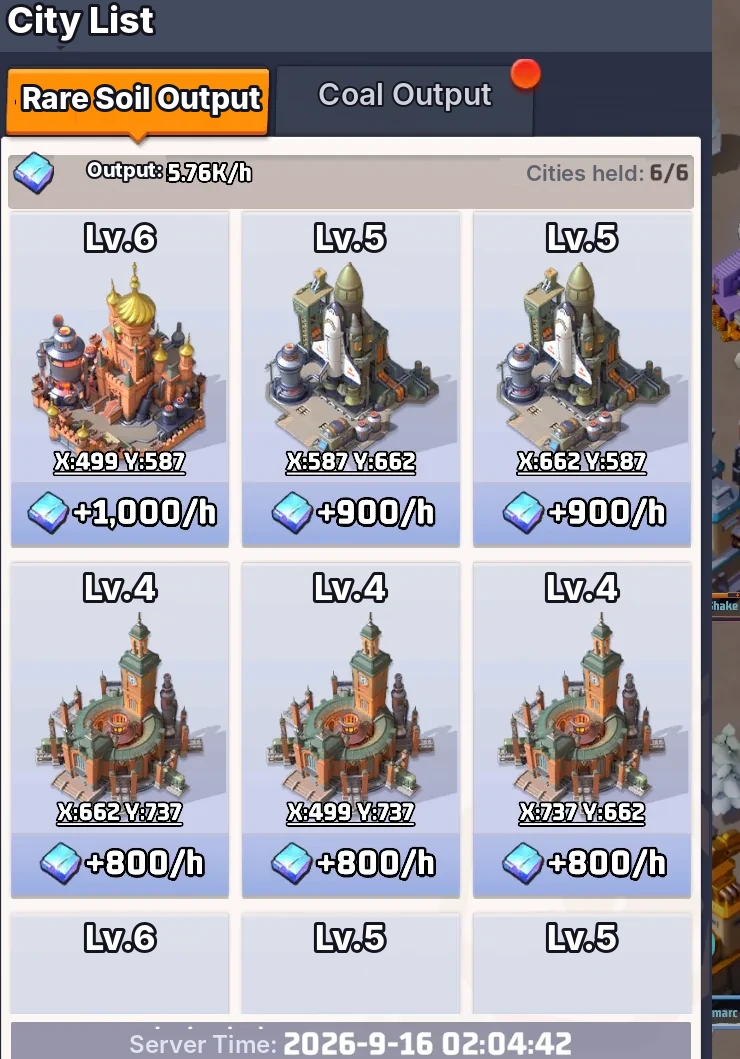
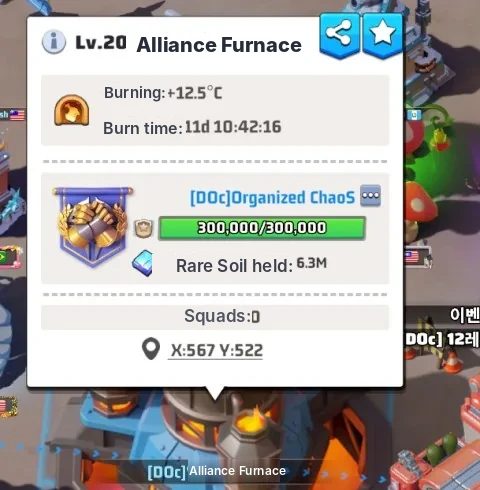
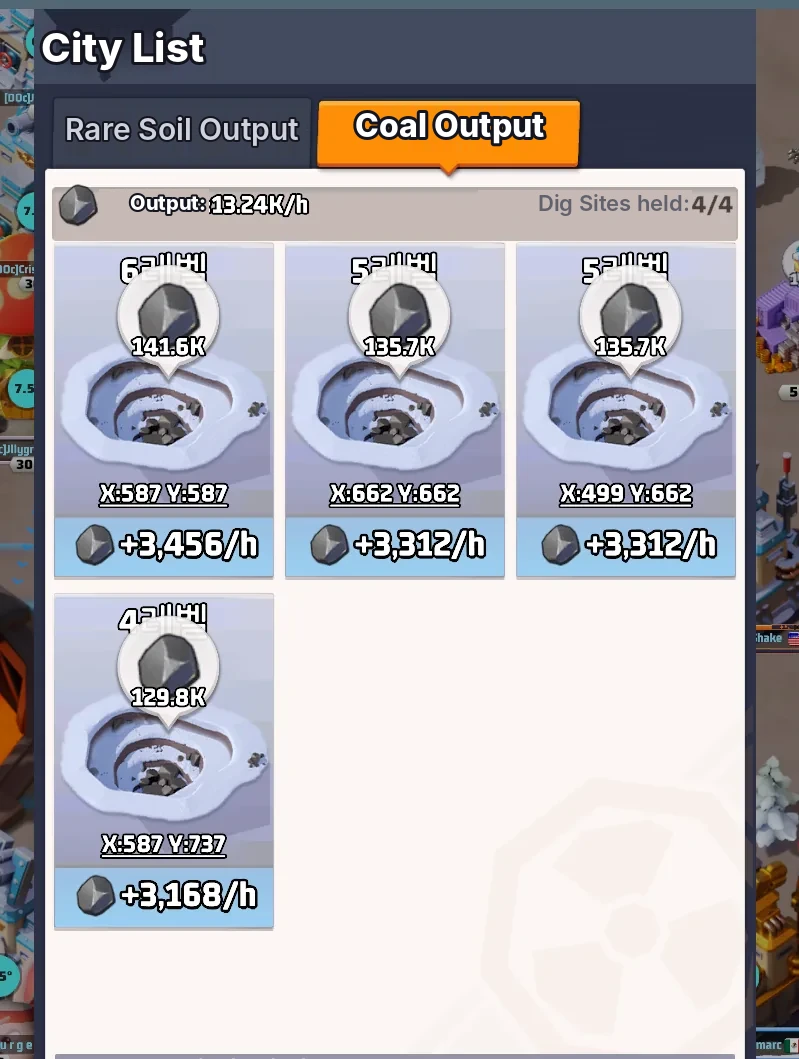
Your alliance captures Cities and Dig Sites on the map. Both produce Rare Soil every hour you hold them, and all of it goes into the Alliance Furnace. Cities make most of it. Dig Sites mainly produce Coal, plus a little Rare Soil.
연맹은 맵의 도시와 채굴지를 점령합니다. 둘 다 점령하는 동안 시간마다 신비한 광물을 만들고, 모두 연맹 용광로에 쌓입니다. 대부분은 도시에서 나오고, 채굴지는 주로 석탄과 약간의 신비한 광물을 만듭니다.
| You capture점령 대상 | Alliance limit연맹 최대 | It produces생산 |
|---|---|---|
| City도시 | 6 | Rare Soil: 350 to 1,000 an hour신비한 광물: 시간당 350~1,000 |
| Dig Site채굴지 | 4 | Coal, plus Rare Soil: 100 to 150 an hour석탄, 그리고 신비한 광물: 시간당 100~150 |
Higher-level Cities are worth far more. A Level 6 City makes nearly three times what a Level 1 City does:
레벨이 높은 도시일수록 훨씬 많이 생산합니다. 6레벨 도시는 1레벨 도시의 약 3배입니다.
Rare Soil per hour, per City. Hold time matters as much as level: the meter runs every hour you hold it and stops the moment you lose it.
도시 1개당 시간당 생산량. 레벨만큼 점령 시간도 중요합니다. 점령하는 동안 계속 쌓이고, 잃는 순간 멈춥니다.
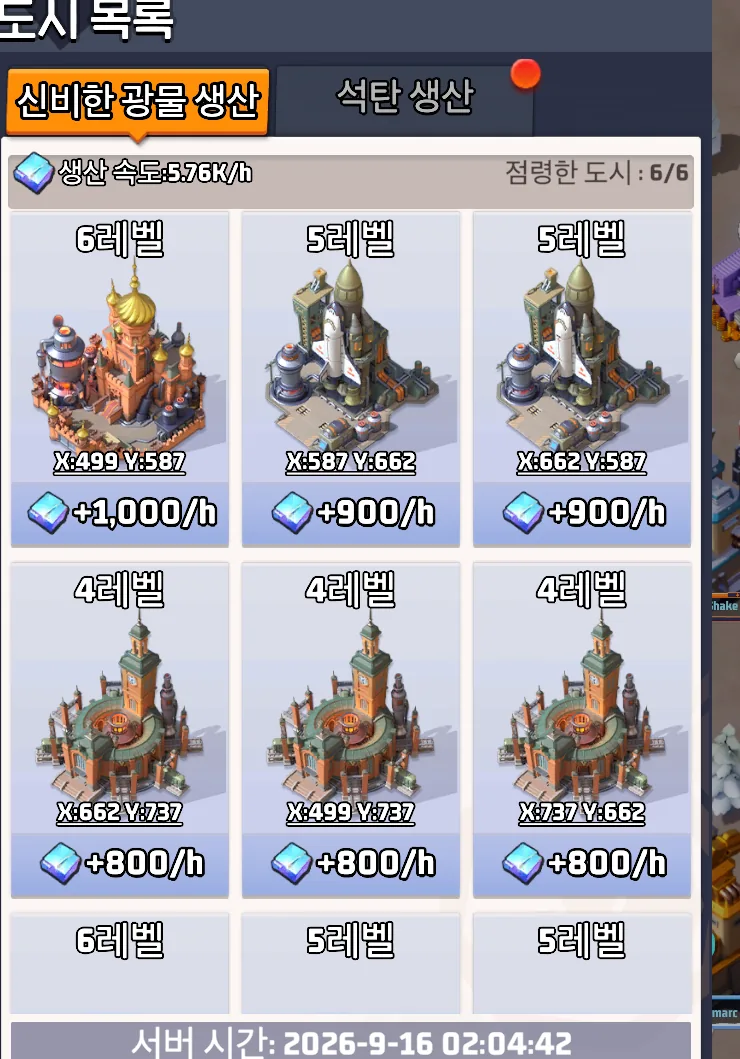
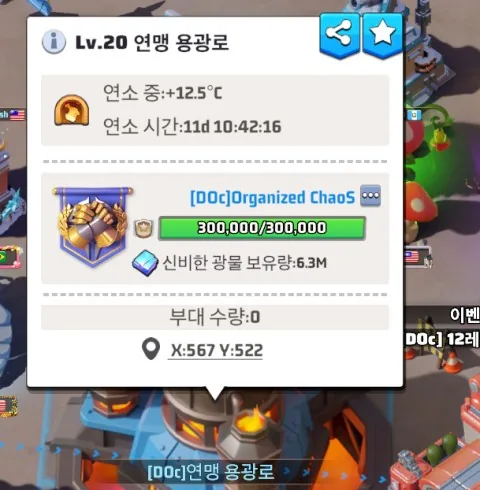
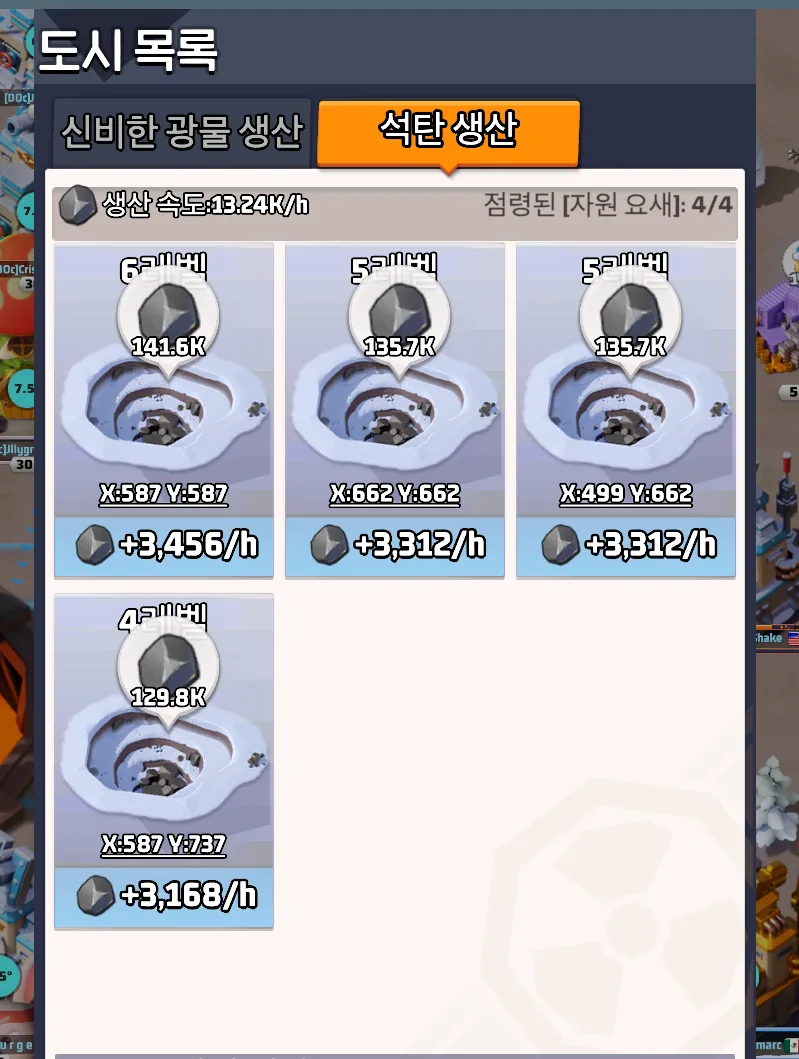
Screens below are from the Korean version of the game, with the text translated into English.
Week 4 on: fight for it4주차부터: 빼앗고 지키기
The Rare Soil War starts. Alliances on opposite sides attack each other's Alliance Furnace. Win an attack and you take a share of their Rare Soil. Lose a defense and they take a share of yours.
광물쟁탈전이 시작됩니다. 상대 진영 연맹끼리 서로의 연맹 용광로를 공격합니다. 공격에 성공하면 상대의 광물 일부를 가져오고, 방어에 실패하면 우리 광물 일부를 잃습니다.
Temperature온도
ConfirmedSeason 2 is cold, and the cold costs you. Keep your base above -20°C or it freezes. Keep it warm and you get real bonuses, including in the Rare Soil War.
시즌2는 춥고, 추위에는 대가가 따릅니다. 기지 온도를 -20°C 위로 유지하세요. 아래로 내려가면 기지가 얼어붙습니다. 따뜻하게 유지하면 광물쟁탈전을 포함해 실제 보너스를 받습니다.
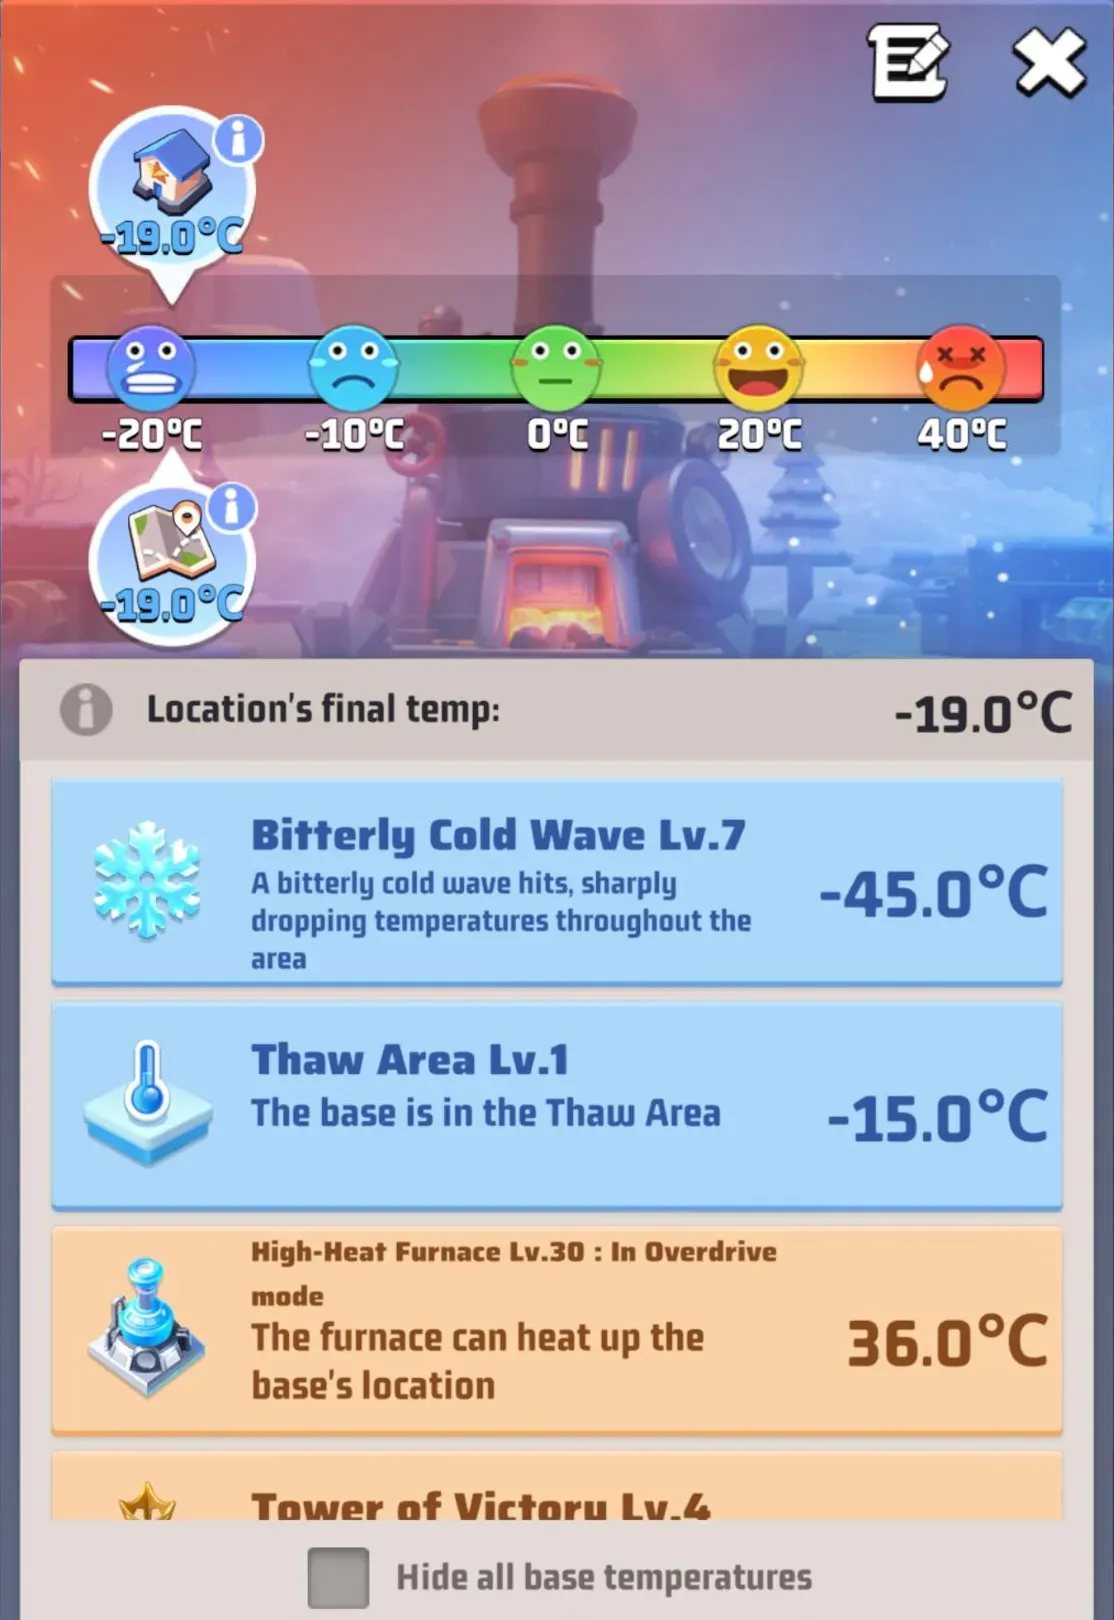
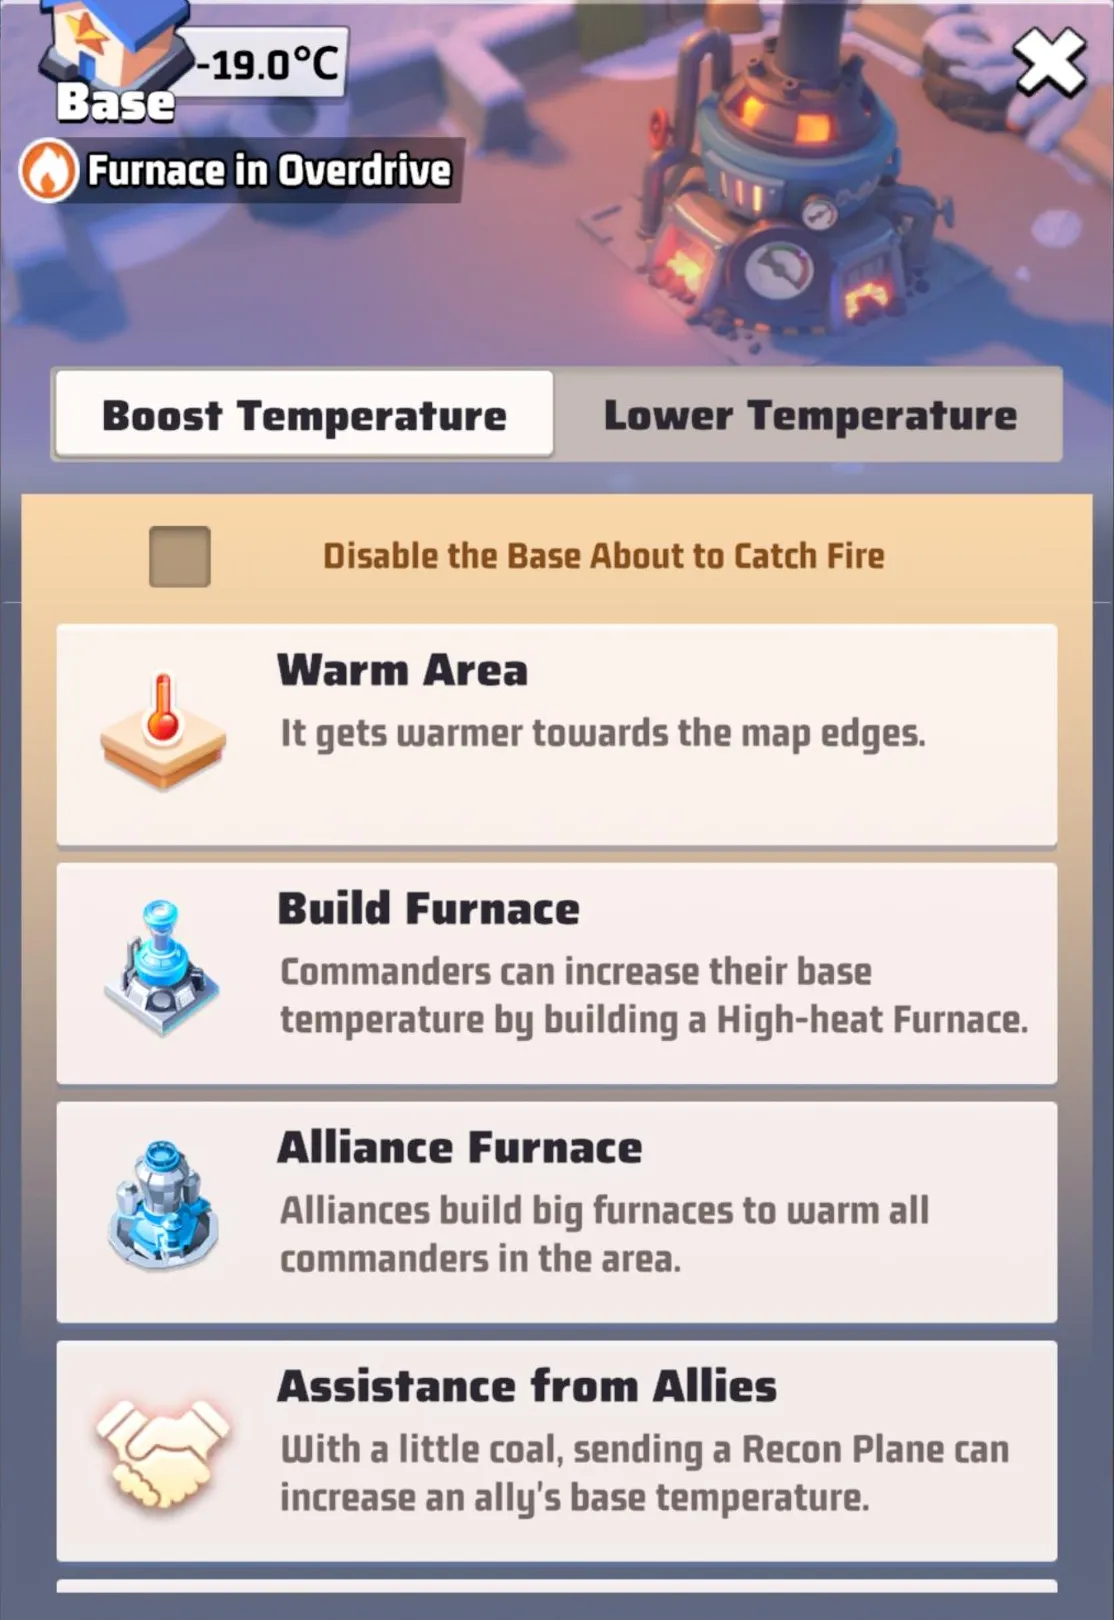
New in Season 2. To check yours, tap your base temperature on the left side of the world map. The Location tab shows what's heating and cooling you, the Base tab shows what your temperature does to you, and the Manual tab has the rules. Everything in this section comes from those screens on #2211.
시즌2 신규 시스템입니다. 월드맵 왼쪽의 기지 온도를 누르세요. Location 탭은 나를 데우고 식히는 요소, Base 탭은 온도에 따른 효과, Manual 탭은 규칙을 보여 줍니다. 이 섹션의 내용은 모두 #2211의 해당 화면에서 확인했습니다.
What cools you, what warms you온도를 낮추는 것, 올리는 것
Your temperature is all of these added up. The Location tab lists each one and the total.
기지 온도는 아래 요소를 모두 더한 값입니다. Location 탭에서 항목별 수치와 합계를 볼 수 있습니다.
- Bitterly Cold Wave: periodic blizzards that drop the whole map. On #2211 it hit -45°C on Nov. 2.
- Cold Area: it gets colder toward the map center.
- Marching: sending troops out takes a little heat from your base.
- Polar Monsters: an attack on your base costs 5°C, or 10°C if your defense fails.
- Bitterly Cold Wave: 주기적인 눈보라로 맵 전체 온도가 떨어집니다. #2211에서는 11월 2일 -45°C였습니다.
- Cold Area: 맵 중앙으로 갈수록 추워집니다.
- 출정: 부대를 내보내면 기지 온도가 조금 내려갑니다.
- Polar Monsters: 기지가 공격받으면 5°C, 방어에 실패하면 10°C 내려갑니다.
- High-heat Furnace: the heater in your base. Overdrive gives the biggest boost: +36°C from a Level 30 furnace on #2211.
- Alliance Furnace: warms every member inside its area.
- City Heating Area: capture a City and you can turn on its heating.
- Assistance from Allies: an ally can send a Recon Plane with a little Coal to warm you.
- Warm Area: it gets warmer toward the map edges.
- Nuclear Furnace: once it's activated, it warms the entire map.
- High-heat Furnace: 내 기지의 난방 건물. Overdrive가 가장 크게 올려 줍니다. #2211에서 30레벨 용광로로 +36°C였습니다.
- 연맹 용광로: 범위 안의 모든 연맹원을 데워 줍니다.
- City Heating Area: 도시를 점령하면 난방을 켤 수 있습니다.
- Assistance from Allies: 동맹이 석탄을 조금 써서 Recon Plane을 보내면 온도가 올라갑니다.
- Warm Area: 맵 가장자리로 갈수록 따뜻해집니다.
- Nuclear Furnace: 활성화되면 맵 전체를 데워 줍니다.
Working Guides say Overdrive burns about 4 times as much Coal as the normal setting, and one suggests keeping at least 4 hours of Coal in reserve.
Working 가이드에 따르면 Overdrive는 일반 설정보다 석탄을 약 4배 쓰며, 한 가이드는 최소 4시간 분량을 남겨 두라고 권합니다.
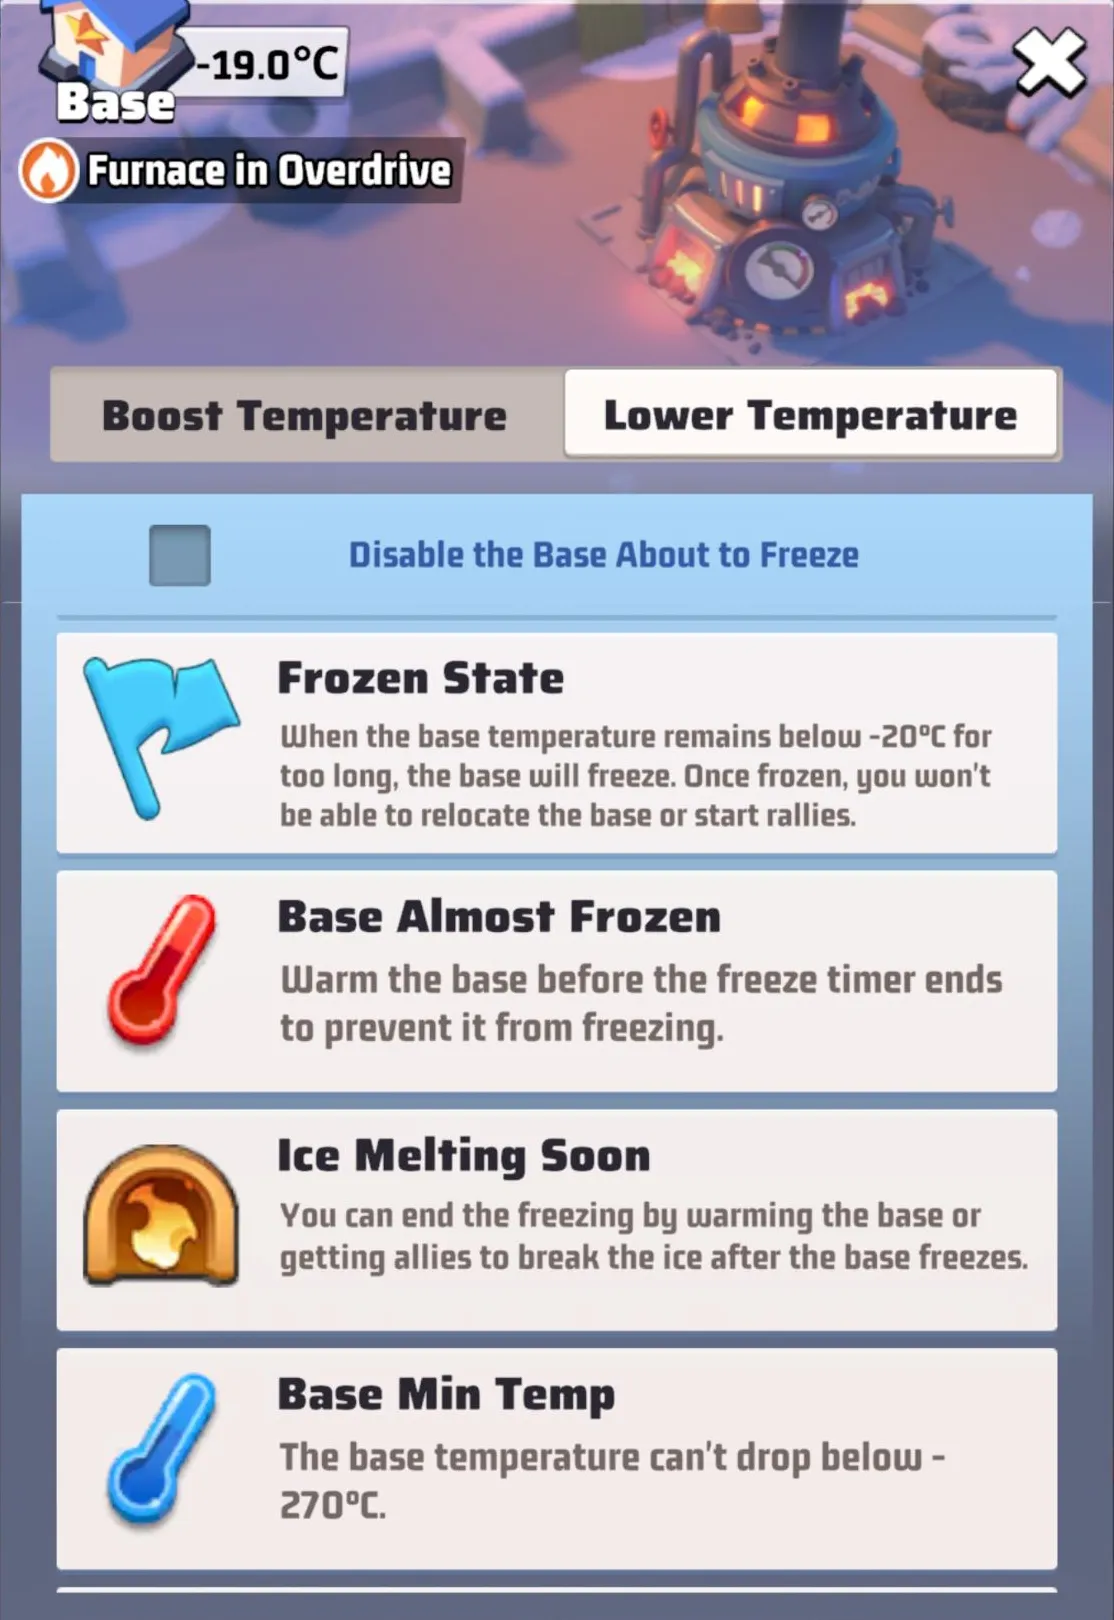
Below -20°C: Frozen-20°C 아래: 결빙
- Below -20°C. The game warns you ("Temperature below -20°C!") and a "Freezes in" countdown starts. Warm up before it runs out.
- Countdown ends. Your base is Frozen. You can't relocate it (no Advanced Teleporter) or start rallies. Alliance and random relocates still work.
- Thawing. Warm back above -20°C, or have allies break the ice. A "Thaws in" countdown runs before you're free.
- -20°C 아래. 경고("Temperature below -20°C!")와 함께 "Freezes in" 카운트다운이 시작됩니다. 끝나기 전에 온도를 올리세요.
- 카운트다운 종료. 기지가 얼어붙습니다(Frozen). 기지 이전(고급 기지 이동 포함)과 집결 시작이 불가능합니다. 연맹 이전과 무작위 이전은 가능합니다.
- 해제. -20°C 위로 올리거나 동맹에게 얼음을 깨 달라고 하세요. "Thaws in" 카운트다운이 끝나면 풀립니다.
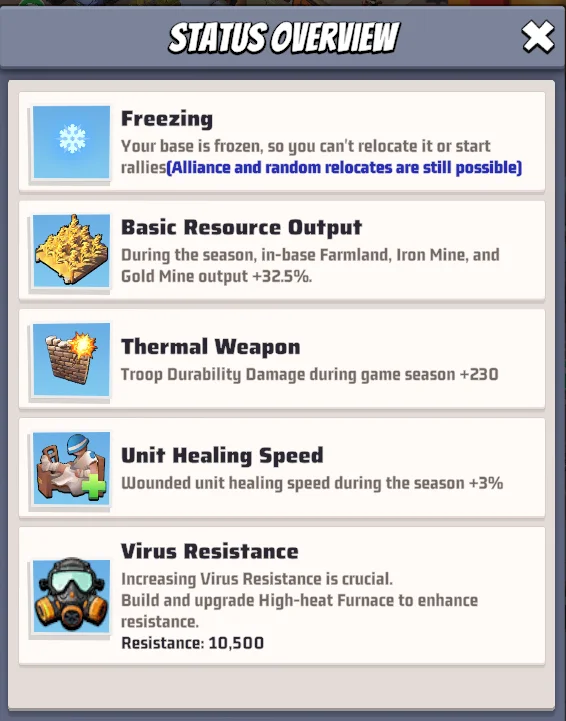
What your temperature does온도에 따른 효과
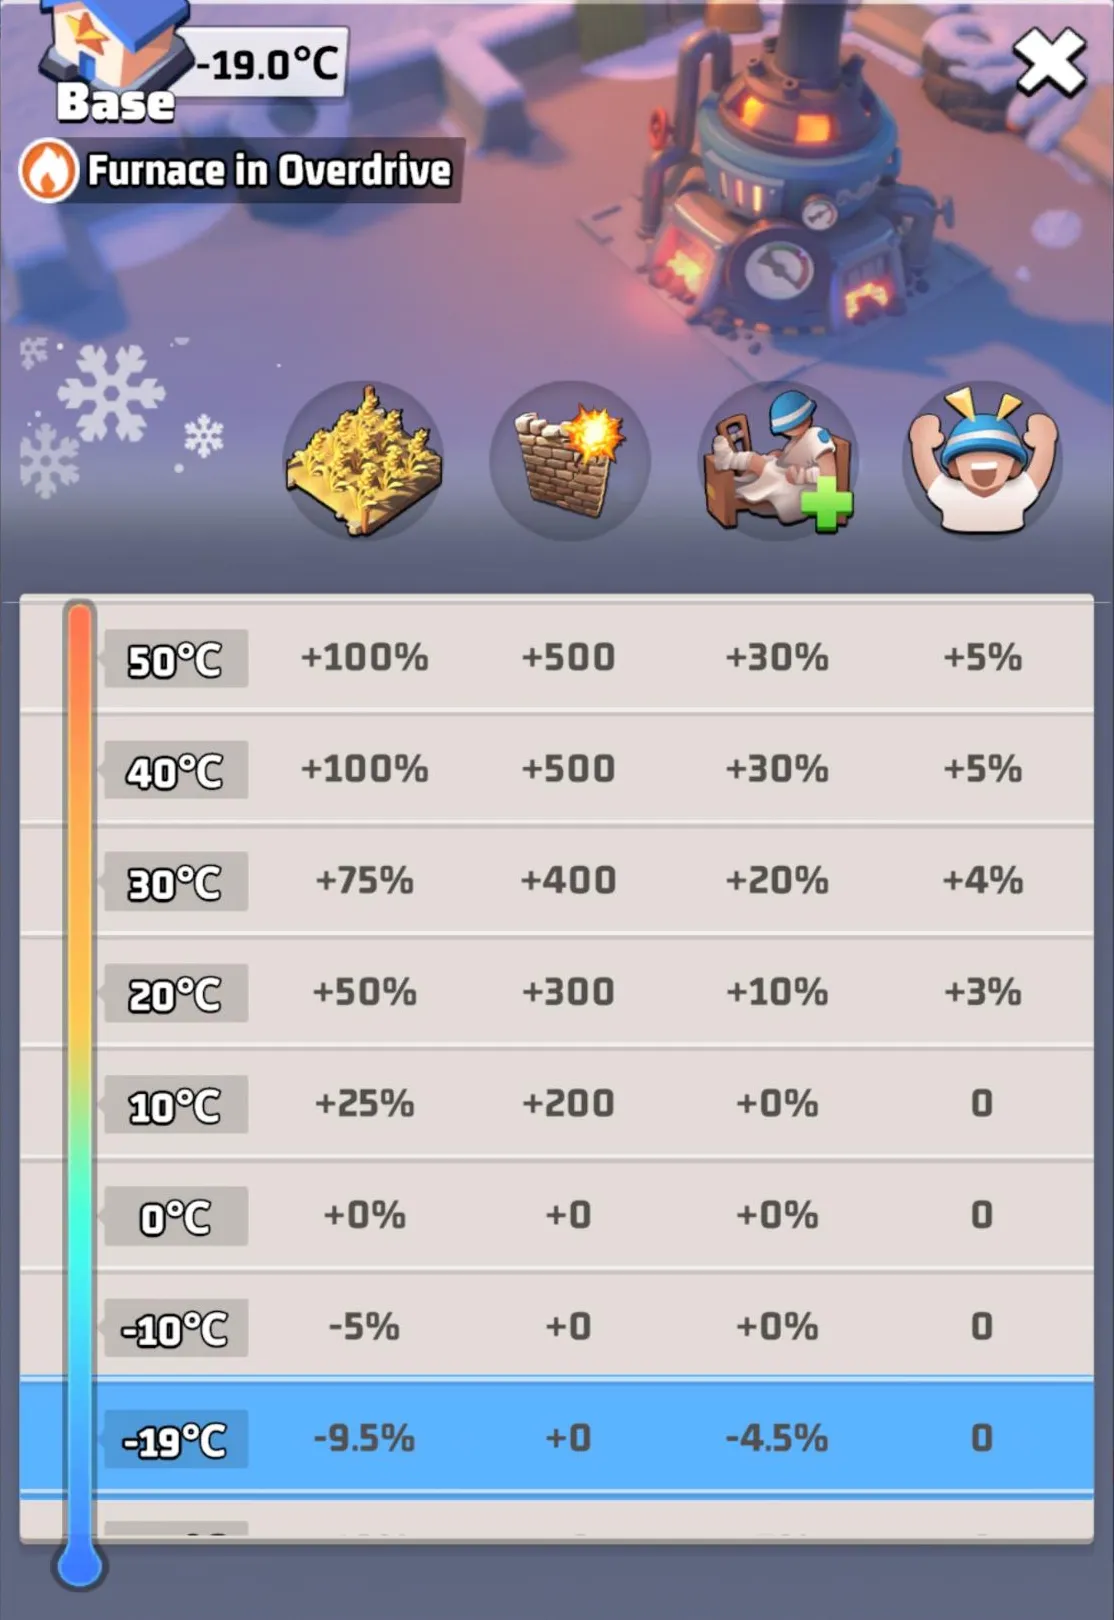
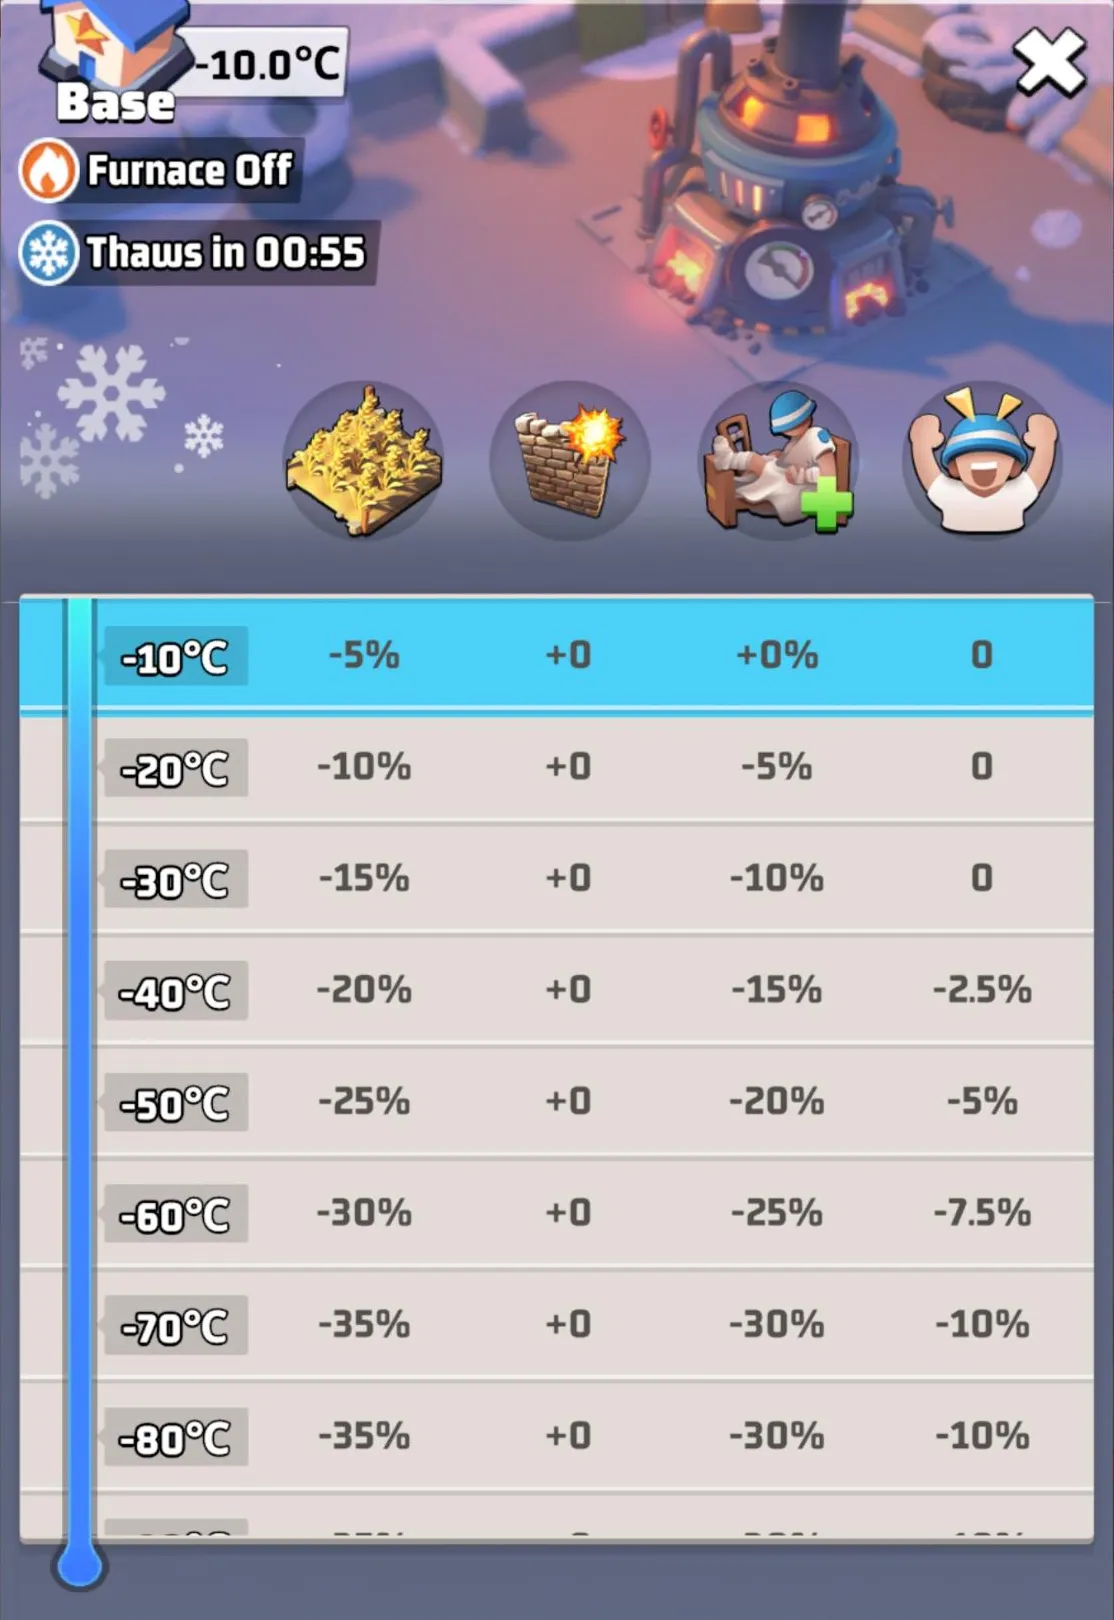
The Base tab shows four effects at every 10°C step. Warm bases get bonuses. Cold bases get penalties.
Base 탭은 10°C 단위로 4가지 효과를 보여 줍니다. 따뜻하면 보너스, 추우면 페널티입니다.
| Base temp기지 온도 | Basic Resource OutputBasic Resource Output | Thermal WeaponThermal Weapon | Unit Healing SpeedUnit Healing Speed | Units MoraleUnits Morale |
|---|---|---|---|---|
| 50°C | +100% | +500 | +30% | +5% |
| 40°C | +100% | +500 | +30% | +5% |
| 30°C | +75% | +400 | +20% | +4% |
| 20°C | +50% | +300 | +10% | +3% |
| 10°C | +25% | +200 | 0% | 0 |
| 0°C | 0% | 0 | 0% | 0 |
| -10°C | -5% | 0 | 0% | 0 |
| -20°C | -10% | 0 | -5% | 0 |
| -30°C | -15% | 0 | -10% | 0 |
| -40°C | -20% | 0 | -15% | -2.5% |
| -50°C | -25% | 0 | -20% | -5% |
| -60°C | -30% | 0 | -25% | -7.5% |
| -70 to -260°C | -35% | 0 | -30% | -10% |
| -270°C | -99% | 0 | -99% | -99% |
- Basic Resource Output: Farmland, Iron Mine and Gold Mine output in your base.
- Thermal Weapon: extra Troop Durability Damage. Warm bases only.
- Unit Healing Speed: how fast wounded troops heal.
- Units Morale: applies game-wide.
- Basic Resource Output: 기지 안 농지, 철광, 금광 생산량.
- Thermal Weapon: 부대의 내구도 피해 추가. 따뜻할 때만 적용.
- Unit Healing Speed: 부상병 치료 속도.
- Units Morale: 게임 전체에 적용됩니다.
Penalties stop growing at -70°C and stay the same down to -260°C. At -270°C, the lowest a base can go, almost everything drops by 99%. Between steps the numbers scale smoothly: at -19°C, #2211 showed -9.5% output and -4.5% healing.
페널티는 -70°C에서 최대가 되고 -260°C까지 같습니다. 최저 온도인 -270°C에서는 거의 모든 효과가 99% 감소합니다. 단계 사이 값은 비례해서 바뀝니다. -19°C에서 #2211은 생산량 -9.5%, 치료 속도 -4.5%였습니다.
50°C and up: Burning50°C 이상: 화재
Too hot is a problem too. Stay at 50°C or above and a burn timer starts. If it runs out, your base catches fire and slowly loses durability. Cooling down stops it either way: turn off your furnace or switch off Overdrive.
너무 뜨거워도 문제입니다. 50°C 이상이 계속되면 화재 타이머가 시작되고, 끝나면 기지에 불이 붙어 내구도가 천천히 줄어듭니다. 어느 단계든 온도를 내리면 멈춥니다. 용광로를 끄거나 Overdrive를 해제하세요.
Limits: a base can't drop below -270°C or go above 300°C.
한계: 기지 온도는 -270°C 아래로 내려가거나 300°C를 넘을 수 없습니다.
Coming up다가오는 일정
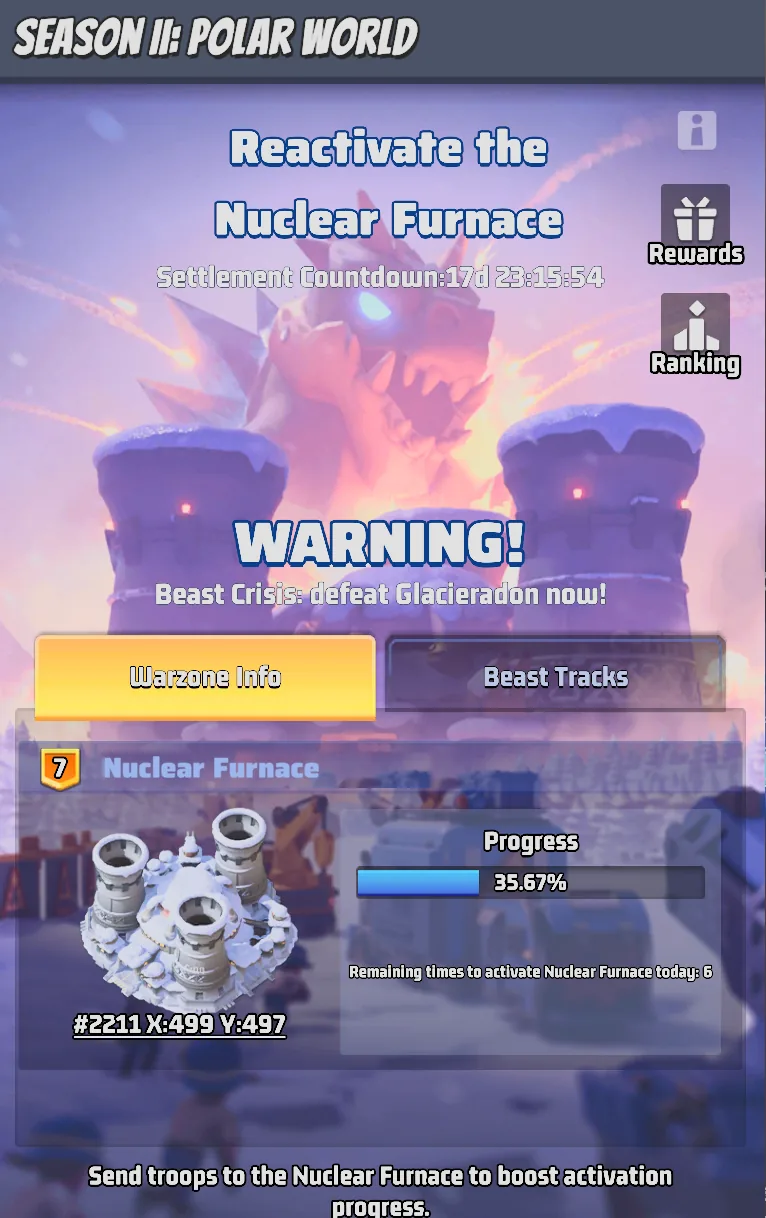
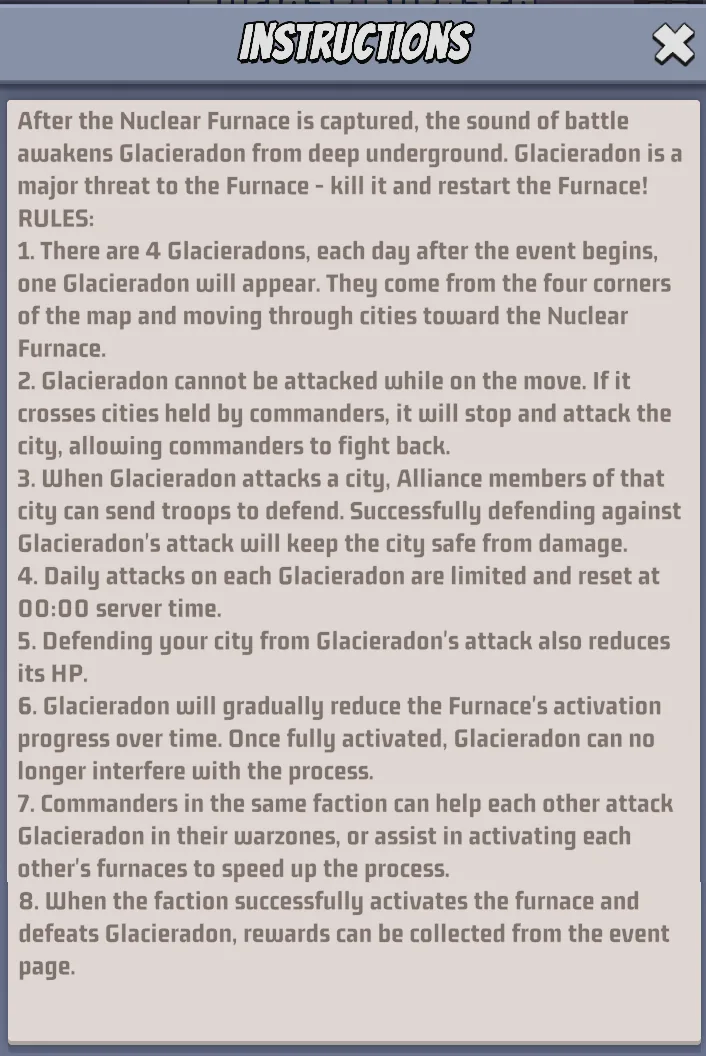
Working- Nuclear Furnace. Confirmed Running on #2211 now as "Reactivate the Nuclear Furnace", until about reset on Nov. 30 ST. Once an alliance captures the Nuclear Furnace at the center of the map, the whole warzone sends troops to restart it. Four Glacieradons, one a day, walk in from the map corners and slowly lower its progress until it is fully on. They stop to attack Cities that alliances hold, and defending those Cities lowers their HP. The sooner the furnace runs, the more it warms your warzone. See the calendar card for the full rules.
- Week 5 (from Nov. 9). Two guides say the Cold Wave low drops to -90°C.
- Nuclear Furnace. Confirmed #2211에서 "Reactivate the Nuclear Furnace"로 진행 중이며, 서버 시간 11월 30일 리셋경까지입니다. 한 연맹이 맵 중앙의 Nuclear Furnace를 점령하면 전쟁구역 전체가 병력을 보내 재가동합니다. Glacieradon 4마리가 하루에 한 마리씩 맵 모서리에서 다가와, 완전히 가동될 때까지 진행도를 조금씩 깎습니다. 연맹이 보유한 도시에 멈춰 공격하며, 그 도시를 방어하면 HP가 줄어듭니다. 빨리 가동할수록 전쟁구역이 더 따뜻해집니다. 전체 규칙은 캘린더 카드를 보세요.
- 5주차(11월 9일부터). 두 가이드에 따르면 Cold Wave 최저 기온이 -90°C로 내려갑니다.
We'll update this as each one shows up on #2211.
#2211에서 확인되는 대로 업데이트하겠습니다.
When we fight전투 일정
WorkingEight battles over four weeks. Every Wednesday and Saturday, Season Weeks 4 to 7.
4주 동안 8번의 전투. 시즌 4~7주차 매주 수요일과 토요일.
Battle time전투 시간
| Eastern (ET)미국 동부 (ET) | 9:30 – 10:10 AM |
|---|---|
| Central (CT)미국 중부 (CT) | 8:30 – 9:10 AM |
| Mountain (MT)미국 산악 (MT) | 7:30 – 8:10 AM |
| Pacific (PT)미국 태평양 (PT) | 6:30 – 7:10 AM |
| Server Time (ST)서버 시간 (ST) | 12:30 – 13:10 |
| Korea (KST)한국 (KST) | 11:30 PM – 12:10 AM next day23:30 – 다음 날 00:10 |
US times are standard time, since daylight saving ends Nov. 1. A battle runs 40 minutes when both sides have the same number of alliances, and 30 or 20 minutes when the defenders are outnumbered (see below). Round 1 on #2211 was an even fight: 12:30 to 13:10 ST. If the in-game event screen ever shows a different time, go by the game.
미국 시간은 11월 1일 서머타임 종료 이후 기준입니다. 양쪽 연맹 수가 같으면 전투는 40분이고, 방어측이 수적으로 밀리면 30분 또는 20분입니다(아래 참고). #2211의 1라운드는 같은 수의 전투로 서버 시간 12:30~13:10이었습니다. 게임 이벤트 화면의 시간이 다르면 게임을 따르세요.
Who we fight누구와 싸우나
The servers in our group split into two factions: Rebels and Gendarmerie, four servers each. You fight the other faction. Players in your faction are on your side, even if they're on a different server.
우리 그룹의 서버는 저항군과 헌병대 두 진영으로 나뉩니다(진영당 4개 서버). 상대 진영과 싸우며, 같은 진영이면 다른 서버라도 아군입니다.
Our group: #2184, #2191, #2193, #2201, #2202, #2208, #2211 and #2212.
우리 그룹: #2184, #2191, #2193, #2201, #2202, #2208, #2211, #2212.
Attack or defend?공격일까 방어일까?
In each battle your alliance is either attacking or defending. Your faction sets the order. Confirmed for Rounds 1 to 4 on #2211.
전투마다 공격 아니면 방어입니다. 순서는 진영이 정합니다. #2211 1~4라운드에서 Confirmed.
How a battle day runs전투 날 흐름
Confirmed For Round 1, the Rare Soil War screen on #2211 showed four stages, in server time:
Confirmed 1라운드 때 #2211의 광물쟁탈전 화면에 나온 4단계입니다(서버 시간).
- War Declaration Stage, the day before, 00:00 to 24:00 ST. Attacking alliances pick their target.
- Invitation Stage, battle day, 00:00 to 12:00 ST. Alliances can bring in help from their own faction.
- Prep Stage, 12:00 to 12:30 ST (8:00 AM CT).
- Battle Stage, from 12:30 ST (8:30 AM CT).
- War Declaration Stage: 전날 서버 시간 00:00~24:00. 공격하는 연맹이 목표를 정합니다.
- Invitation Stage: 전투 당일 서버 시간 00:00~12:00. 같은 진영 연맹을 지원군으로 부를 수 있습니다.
- Prep Stage: 서버 시간 12:00~12:30.
- Battle Stage: 서버 시간 12:30부터.
Who's in each battle전투 참가 연맹
Confirmed Alliances are sorted into ranking groups: 1 to 10, 11 to 20, 21 to 30, 31 to 50, 51 to 70 and 71 to 100. Your alliance needs an Alliance Furnace to take part.
Confirmed 연맹은 순위 그룹(1~10, 11~20, 21~30, 31~50, 51~70, 71~100위)으로 나뉩니다. 참여하려면 연맹 용광로가 있어야 합니다.
- Guides say you can only declare on an alliance in your own ranking group, and that up to 3 attacking alliances can pick the same target.
- 가이드에 따르면 같은 순위 그룹 안의 연맹에만 선전포고할 수 있고, 한 목표에 최대 3개 연맹이 공격할 수 있습니다.
Calling in help지원군 부르기
Confirmed From the in-game Instructions on #2211. If more than one alliance declares on the same defender, the defender's R4s and R5 can invite other alliances to help during the Invitation Stage.
Confirmed #2211 게임 내 설명 기준. 한 방어 연맹을 여러 연맹이 공격하면, 방어 연맹의 R4 이상이 Invitation Stage 동안 다른 연맹을 지원군으로 부를 수 있습니다.
- Who can help: an alliance in the defender's Rare Soil Ranking Group and faction that nobody declared on this round.
- How many: up to 1 helper against 2 attackers, up to 2 helpers against 3.
- When it locks: at the start of the Prep Stage, attackers, defender and helpers are locked in. From then on, helpers can send squads to reinforce the defender's Alliance Furnace.
- No risk for helpers: assisting alliances never lose Rare Soil. If the defenders win, the defender and every helper get the Defense Victory Reward.
- 지원 가능 연맹: 방어 연맹과 같은 Rare Soil Ranking Group·같은 진영이며, 이번 라운드에 선전포고를 받지 않은 연맹.
- 지원 수: 공격 연맹 2개면 최대 1개, 3개면 최대 2개.
- 확정 시점: Prep Stage가 시작되면 공격·방어·지원 연맹이 확정됩니다. 그때부터 지원 연맹은 방어측 연맹 용광로에 부대를 지원 보낼 수 있습니다.
- 지원 연맹은 손해 없음: 지원 연맹은 신비한 광물을 잃지 않습니다. 방어에 성공하면 방어 연맹과 지원 연맹 모두 방어 승리 보상을 받습니다.
Battle length and the defense bonus전투 시간과 방어 보너스
Confirmed The gap between the number of attacking and defending alliances (helpers count as defenders) sets how long the battle runs and how much a defense win pays:
Confirmed 공격 연맹 수와 방어 연맹 수(지원 연맹 포함)의 차이가 전투 시간과 방어 승리 보상 배수를 정합니다.
| Sides양측 | Battle length전투 시간 | Defense Victory Reward방어 승리 보상 |
|---|---|---|
| Even numbers같은 수 | 40 min | 1x |
| Defenders short by 1방어측 1개 부족 | 30 min | 2x |
| Defenders short by 2방어측 2개 부족 | 20 min | 3x |
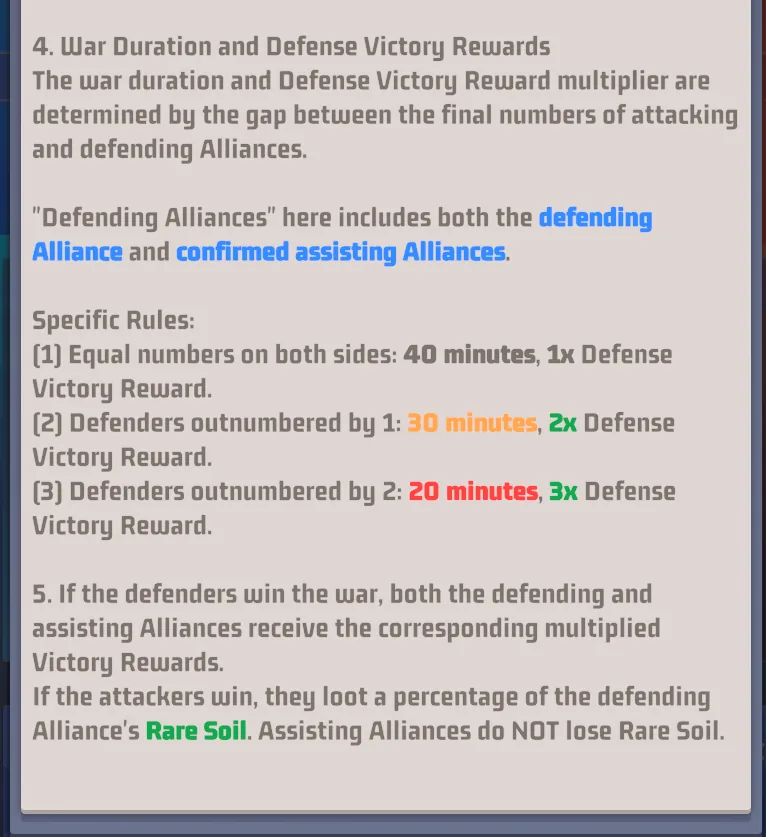
Ganging up on a defender cuts the attackers' time and triples what the defenders win if they hold. Outnumbered isn't hopeless: a short, well-reinforced defense can pay very well.
여럿이 한 방어 연맹을 노리면 공격 시간은 줄고, 방어측이 버티면 보상이 최대 3배가 됩니다. 수적으로 밀려도 짧은 시간을 잘 버티면 큰 보상을 받습니다.
After each battle, the Battle Journal covers what happened on #2211 and what we learned.
전투가 끝날 때마다 전투 일지에 #2211에서 있었던 일과 교훈을 정리합니다.
How a battle is won승패가 갈리는 방법
WorkingEvery battle is about one building: the defending alliance's Alliance Furnace.
모든 전투는 건물 하나, 방어측의 연맹 용광로를 두고 벌어집니다.
Get the enemy's Alliance Furnace to 0% Durability before time runs out. Durability is the Alliance Furnace's health bar. It only drops once the squads defending it are beaten.
시간 안에 상대 연맹 용광로의 내구도를 0%로 만드세요. 내구도는 연맹 용광로의 체력이며, 지키는 부대를 이겨야 줄어듭니다.
Durability does not refill during a battle, so every hit counts. Confirmed The battle ends the moment the defending Alliance Furnace is destroyed, even with time left on the clock. One battle on #2211 was over in 3 minutes 34 seconds, so defenders need to be garrisoned and reinforcing before the start, not after. Confirmed After the battle, a damaged Alliance Furnace gets rebuilt, and the more members garrisoned in it, the faster it rebuilds. Garrison right after a battle so it's back to full before your next turn to defend.
전투 중에는 내구도가 회복되지 않으니 한 번 한 번이 중요합니다. Confirmed 방어측 연맹 용광로가 파괴되면 시간이 남아 있어도 전투는 바로 끝납니다. #2211의 한 전투는 3분 34초 만에 끝났으니, 방어측은 시작 후가 아니라 시작 전에 주둔과 지원을 마쳐야 합니다. Confirmed 전투가 끝나면 손상된 연맹 용광로를 재건하며, 주둔한 연맹원이 많을수록 빨리 재건됩니다. 다음 방어 전에 가득 차도록 전투 직후 주둔하세요.
- Confirmed A defense that holds costs nothing. After a defender wins, the War Status screen says their Rare Soil stays the same.
- Confirmed Who did the damage. On the War Status screen, tap the info icon next to Durability to see the Attacker Contribution Ranking: the Durability damage each attacking alliance did. When several attackers break an Alliance Furnace, Rare Soil is split by that damage.
- Confirmed 방어에 성공하면 손해 없음. 방어측이 이기면 War Status 화면에 신비한 광물이 그대로 유지된다고 표시됩니다.
- Confirmed 누가 얼마나 때렸나. War Status 화면에서 내구도 옆 정보 아이콘을 누르면 Attacker Contribution Ranking이 나옵니다. 공격 연맹별 내구도 피해량이며, 여러 연맹이 함께 연맹 용광로를 파괴하면 이 피해량에 따라 광물을 나눕니다.
How plunder adds up약탈량 계산
A win takes a percentage of the other side's Rare Soil. Confirmed In Round 1 on #2211, the war screen showed 20% of the target's Rare Soil as "Can be Looted." Guides say the amount depends on how much damage the attack does. Here's what that looks like with 20%:
승리하면 상대 신비한 광물의 일정 비율을 가져옵니다(#2211 1라운드 전쟁 화면에서 20% 확인, 가이드에 따르면 피해량에 따라 달라짐). 20%로 계산하면 이렇습니다.
| Us우리 | Them상대 | |
|---|---|---|
| Start시작 | 10.0M | 10.0M |
| They win an attack on us (20% of 10M = 2M)상대 공격 성공 (10M의 20% = 2M) | 8.0M | 12.0M |
| We win an attack on them (20% of 12M = 2.4M)우리 공격 성공 (12M의 20% = 2.4M) | 10.4M | 9.6M |
Same 20% both times, but our win was worth more because their pile was bigger. And whoever wins the last battle keeps what they took, because there's no turn left to take it back.
Kill Rewards: points for everyone처치 보상: 모두가 받는 포인트
Confirmed Separate from plunder, every player earns Kill Rewards points during the war, and the point totals unlock chests at 50,000, 200,000 and 500,000 points. From the War Status screen on #2211:
Confirmed 약탈과 별개로, 전쟁 중 모든 플레이어가 처치 보상 포인트를 얻으며 50,000, 200,000, 500,000 포인트에서 상자가 열립니다. #2211 War Status 화면 기준:
- Kills: 6 points for each Level 1 enemy unit you kill, going up 3 per level to 33 for Level 10.
- Losses count too: 2 points for each Level 1 unit you lose, up to 11 for Level 10.
- Speed-ups: 50 points per minute of Healing or Training speed-ups used.
- Furnace damage: 50 points for each point of Durability you take off the enemy faction's Alliance Furnace, and 5 per point of Durability damage to Ruins.
- 처치: 적 1레벨 유닛 처치당 6포인트, 레벨마다 3씩 올라 10레벨은 33포인트.
- 손실도 포인트: 내 1레벨 유닛 손실당 2포인트, 10레벨은 11포인트.
- 가속: 치료·훈련 가속 1분 사용당 50포인트.
- 용광로 피해: 적 진영 연맹 용광로 내구도 1당 50포인트, 폐허 내구도 피해 1당 5포인트.
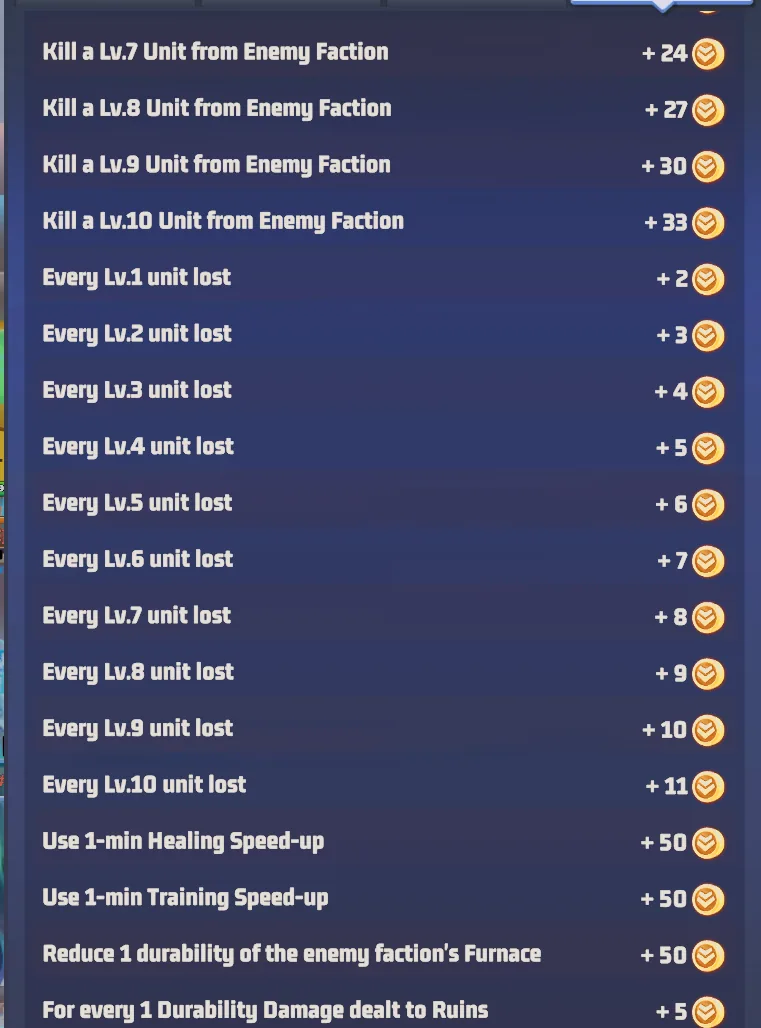
Damage to the enemy Alliance Furnace pays the best rate: 50 points for each point of Durability, more than any single kill (33 for a Level 10 unit). Once its defenders are cleared, keep the hits coming.
적 연맹 용광로 피해가 가장 효율이 좋습니다. 내구도 1당 50포인트로, 어떤 처치보다도 높습니다(10레벨 유닛 33포인트). 수비 부대를 정리한 뒤에는 계속 타격하세요.
Week 6 raises the stakes. The Rare Soil Showdown event in Week 6 makes the remaining battles worth more. Guides say the cap goes up to 30%.
같은 20%여도 상대 광물이 더 많았기 때문에 우리가 더 많이 가져왔습니다. 그리고 마지막 전투의 승자는 되찾길 걱정할 필요가 없습니다.
6주차에는 판이 커집니다. 6주차 Rare Soil Showdown 이벤트 이후 남은 전투의 가치가 올라갑니다. 가이드 기준 최대 30%.
The Warlord Missile전쟁군주 미사일
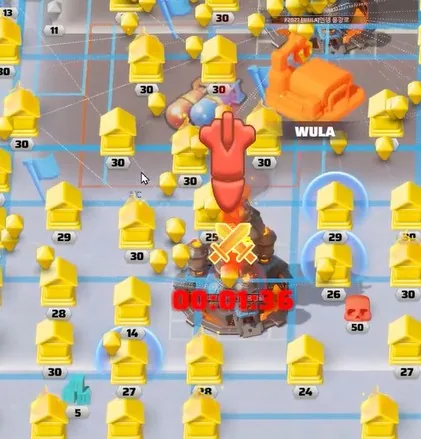
WorkingOnce per battle, the attacking side can fire the Warlord Missile at the enemy's Alliance Furnace. Only the player holding the Warlord title can launch it.
공격측은 전투마다 한 번 상대 연맹 용광로에 전쟁군주 미사일을 쏠 수 있습니다. 전쟁군주 직책을 가진 사람만 발사할 수 있습니다.
What happens진행 순서
- Launch. The Warlord fires it during Preparation or the battle itself.
- 3-minute countdown. The whole server can see where the Warlord's base is.
- Don't get moved. If the Warlord's base gets moved during the countdown, the launch fails and the Warlord Missile can't be used again for 72 hours.
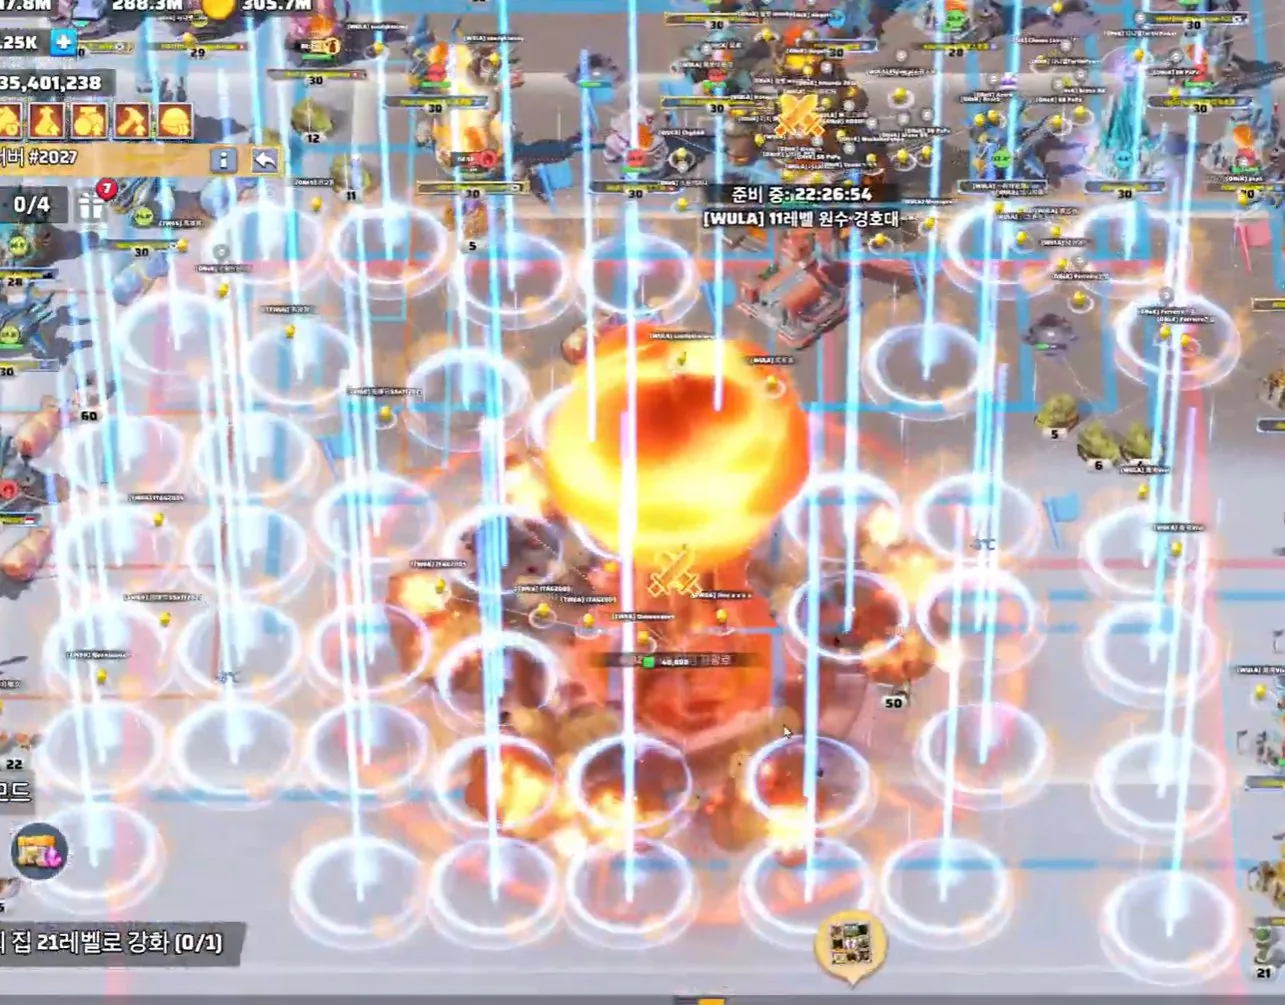
- Impact. The Alliance Furnace takes damage, and every base in a 25 x 25 area around it is moved to a random spot.
- 발사. 준비 단계나 전투 중에 전쟁군주가 발사합니다.
- 3분 카운트다운. 서버 전체에 전쟁군주의 기지 위치가 공개됩니다.
- 기지 이동 금지. 카운트다운 중 전쟁군주 기지가 밀려나면 발사가 실패하고 72시간 동안 다시 쓸 수 없습니다.
- 명중. 연맹 용광로가 피해를 입고, 주변 25 x 25 범위의 모든 기지가 무작위 위치로 이동합니다.
- Alliance Furnace: takes damage.연맹 용광로: 피해를 입음.
- Bases inside the area: moved to random spots. Shields stay on.범위 안의 기지: 무작위 위치로 이동. 보호막은 유지.
- The area becomes Contaminated Land for 1 hour. Shields don't work there.범위는 1시간 동안 Contaminated Land가 되며 보호막이 작동하지 않습니다.
- Bases outside the area: not affected.범위 밖의 기지: 영향 없음.
What to do해야 할 일
- Warlord: launch from a quiet spot away from the fighting. Nearby members help guard your base for the 3 minutes.
- Confirmed Bury the launch notice: when the Warlord Missile launches, the game posts a notice in the enemy's World chat that points them to the Warlord. Have members post in that World chat right away so the notice scrolls out of sight before the other side can find the Warlord and move their base.
- Everyone: have an Advanced Teleporter ready before the battle, and keep your base warm so it isn't Frozen when you need it. Right after impact, the land around the Alliance Furnace is empty. The side that moves in first controls it.
- Attacking: move in close to the enemy's Alliance Furnace.
- Defending: if you got moved, use an Advanced Teleporter to get straight back to your spot.
- 전쟁군주: 전투 지역에서 떨어진 조용한 곳에서 발사하세요. 근처 연맹원이 3분 동안 기지를 지켜줍니다.
- Confirmed 발사 알림 묻기: 전쟁군주 미사일을 발사하면 상대 월드 채팅에 전쟁군주 위치를 알려주는 알림이 뜹니다. 발사 직후 연맹원들이 상대 월드 채팅에 바로 글을 올려 알림이 밀려 올라가게 하면, 상대가 전쟁군주를 찾아 기지를 옮기기 어려워집니다.
- 모두: 전투 전에 고급 기지 이동을 준비하고, 필요할 때 기지가 얼어 있지 않도록 따뜻하게 유지하세요. 명중 직후 연맹 용광로 주변이 비고, 먼저 들어가는 쪽이 차지합니다.
- 공격일 때: 상대 연맹 용광로 가까이 들어가세요.
- 방어일 때: 밀려났다면 바로 원래 자리로 돌아오세요.
Timed attacks타이머 공격
TacticA timed attack means every squad lands on the target at the same moment. You'll also hear players call it ToT, short for Time on Target.
타이머 공격은 모든 부대가 같은 순간에 목표에 도착하는 공격입니다. ToT(Time on Target)라고도 부릅니다.
Why it works왜 효과적인가
Defenders keep sending fresh squads into their Alliance Furnace. If our squads show up one at a time, each one runs into a refilled defense. If they all land together, they hit at once and break through.
방어측은 계속 새 부대를 연맹 용광로에 보냅니다. 우리 부대가 하나씩 도착하면 매번 다시 채워진 방어와 싸우게 됩니다. 한꺼번에 도착해야 뚫을 수 있습니다.
Everyone's march time is different. It depends on how far away you are, your buildings, research and heroes. So everyone sends at a different moment, and everyone lands together.
사람마다 출정시간이 다릅니다(거리, 건물, 연구, 영웅). 그래서 출발 시간은 모두 다르고, 도착은 함께입니다.
How to do it하는 방법
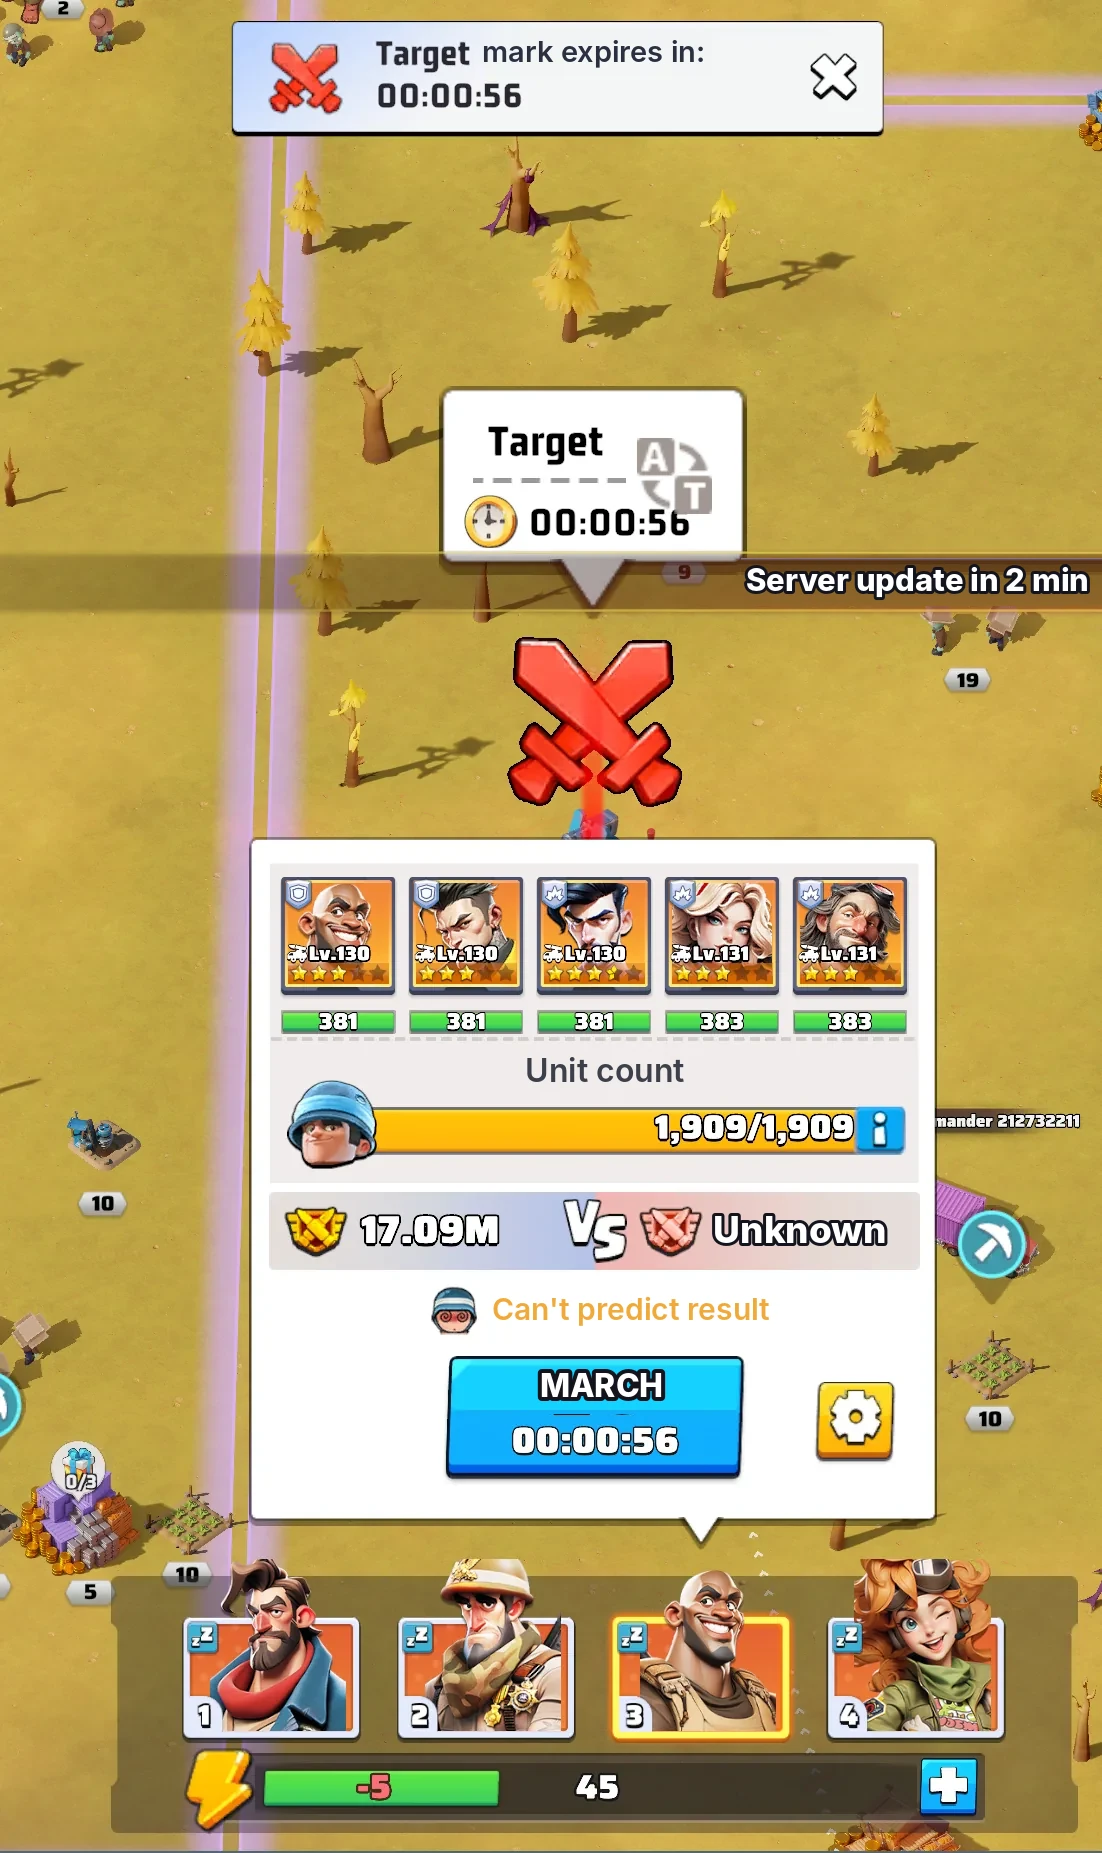
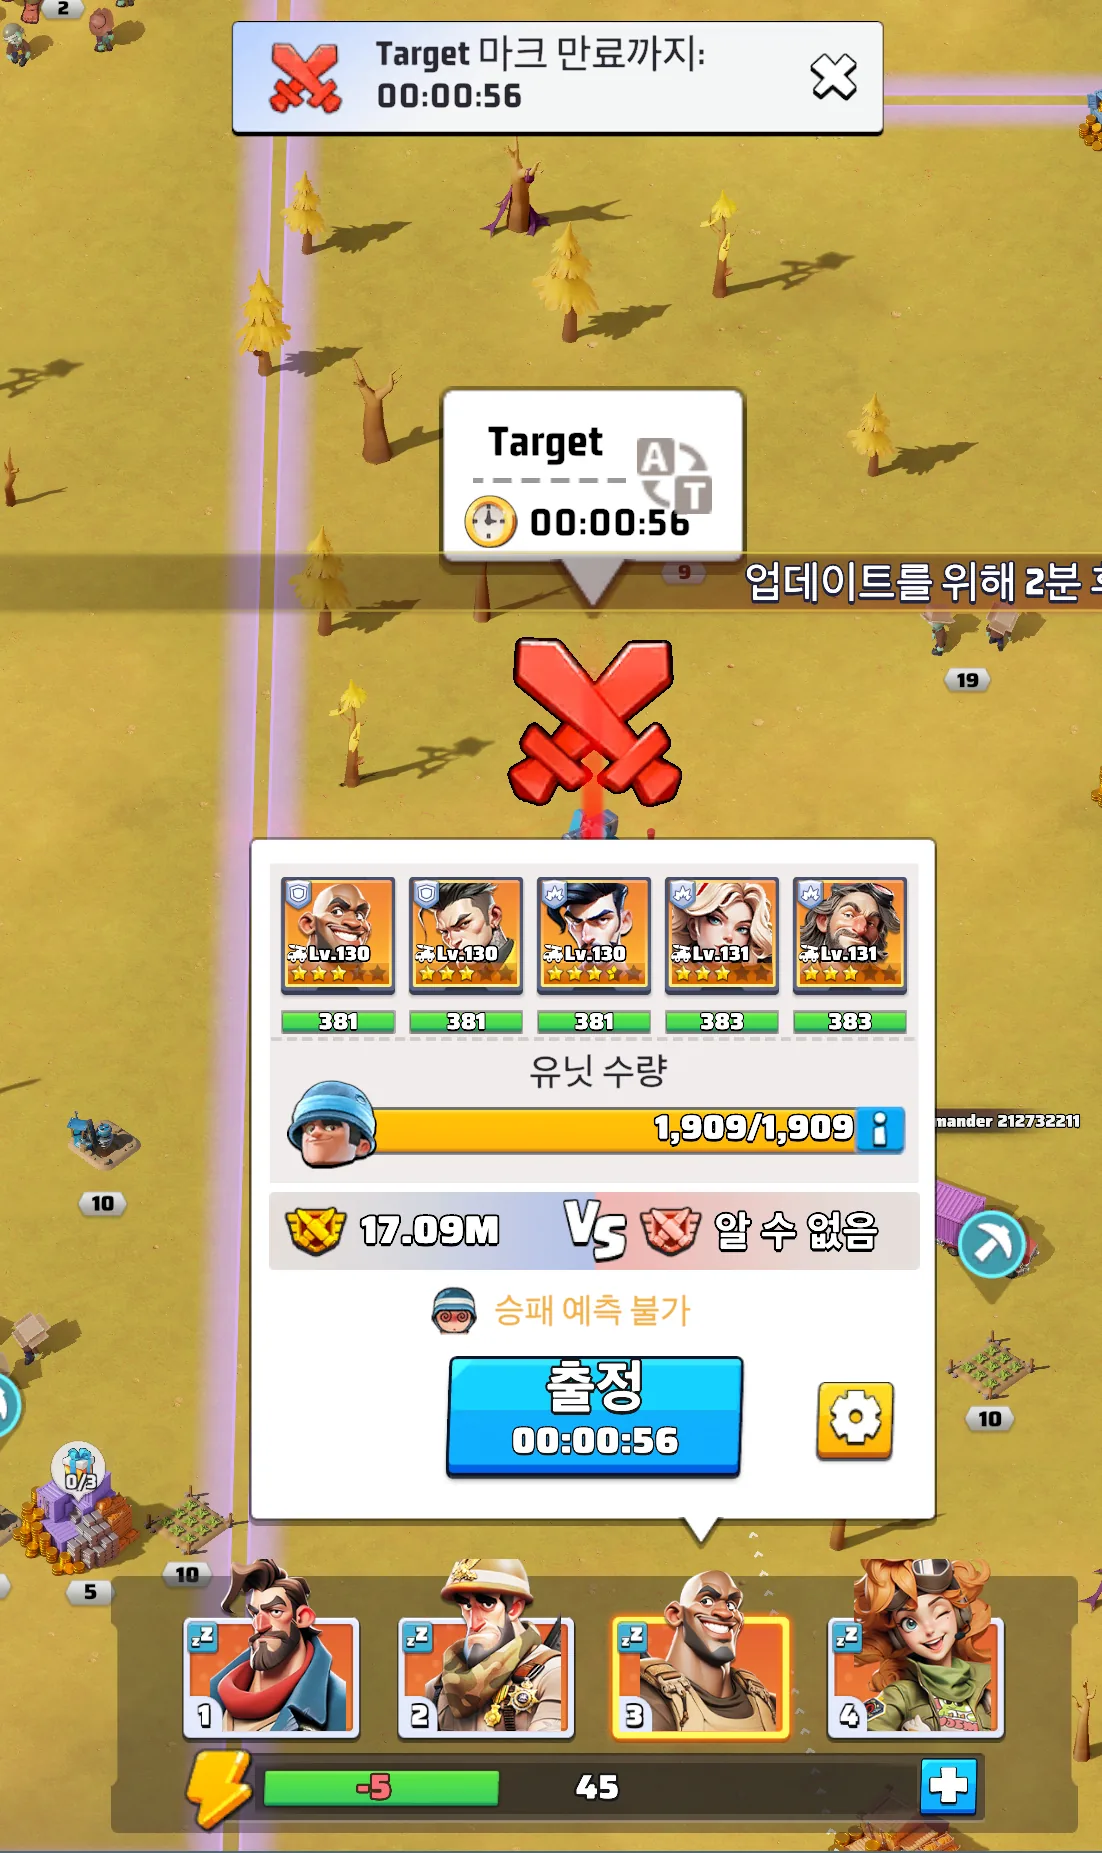
- Leadership puts a Target mark with a countdown on the enemy's Alliance Furnace.
- Select your squad and the target. Your march time shows on the March button.
- Wait. The moment the Target countdown matches your march time, tap March.
- 리더십이 상대 연맹 용광로에 카운트다운이 있는 Target 마크를 겁니다.
- 부대와 목표를 선택하면 출정 버튼에 출정시간이 나옵니다.
- 기다리다가 Target 카운트다운과 내 출정시간이 같아지는 순간 출정을 누르세요.
Tips팁
- Each of your four squads can have a different march time. Check every one before the battle.
- Practice with one squad first. Once that feels easy, try all four.
- Missed your moment? Ask in AC before you send. A squad that arrives alone usually gets beaten.
- 부대 4개의 출정시간은 서로 다를 수 있습니다. 전투 전에 모두 확인하세요.
- 먼저 1부대로 연습하고, 익숙해지면 4부대 모두로 해보세요.
- 타이밍을 놓쳤다면 보내기 전에 AC에 물어보세요. 혼자 도착한 부대는 대부분 집니다.
Defense방어
TacticDefending is simpler than attacking. It just takes discipline.
방어는 공격보다 단순합니다. 필요한 건 꾸준함입니다.
Hold your spot자리 지키기
Stay on your assigned spot near the Alliance Furnace for the whole battle. An empty spot is a place the enemy can move into and attack from. Bookmark it so you can get back fast.
전투 내내 연맹 용광로 근처 지정 자리를 지키세요. 빈자리는 적이 들어와 공격하는 거점이 됩니다. 즐겨찾기에 등록해 두면 빨리 돌아올 수 있습니다.
Keep reinforcing계속 지원하기
Keep squads reinforcing the Alliance Furnace, and send new ones as they get beaten.
연맹 용광로에 부대를 계속 지원하고, 패배하면 바로 새 부대를 보내세요.
Hit empty bases빈 기지 공격하기
Attackers often send every squad out at once, which leaves their bases empty. Scout them. An empty base is an easy hit.
공격측은 부대를 한꺼번에 보내는 경우가 많아 기지가 빕니다. 정찰해 보고 비어 있으면 공격하세요.
Warlord Missile hit? Go straight back미사일에 밀리면 바로 복귀
If the Warlord Missile moves your base, use an Advanced Teleporter and get back to your spot right away. That only works if your base isn't Frozen, so keep it warm.
전쟁군주 미사일에 밀려났다면 고급 기지 이동으로 바로 자리로 돌아오세요. 기지가 얼어 있으면(Frozen) 쓸 수 없으니 따뜻하게 유지하세요.
Working Holding out while outnumbered pays more. Guides say a successful defense pays 2 times the rewards when you're outnumbered by one alliance, and 3 times when you're outnumbered by two.
Working 수적으로 불리할 때 지켜내면 보상이 더 큽니다. 가이드에 따르면 1개 연맹 차이로 불리할 때 방어에 성공하면 보상 2배, 2개 연맹 차이면 3배입니다.
Battle-day checklist전투 날 체크리스트
- Advanced Teleporters in your bag
- Troops healed
- High-heat Furnace on and Coal stocked
- March times checked for all four squads
- Battle plan read in AC
- 고급 기지 이동 준비
- 병력 치료
- High-heat Furnace 켜기, 석탄 준비
- 4부대 출정시간 확인
- AC의 전투 계획 확인
Terms in this guide용어 정리
- AC (Alliance Chat)AC (연맹 채팅)
- Your alliance's chat channel. Battle plans and last-minute calls get posted here.연맹 채팅 채널. 전투 계획과 실시간 지시가 여기에 올라옵니다.
- ST (Server Time)ST (서버 시간)
- The game's own clock, the one event times use. It is 2 hours behind UTC (UTC-2). 12:30 ST is 8:30 AM Central after Nov. 1.게임 이벤트 시간에 쓰는 서버 시계. UTC보다 2시간 늦습니다(UTC-2).
- Squad부대
- One of your marching armies, each led by heroes. Most players run up to four.영웅이 이끄는 출정 부대. 대부분 최대 4개까지 운영합니다.
- Advanced Teleporter고급 기지 이동
- An item that moves your base to a spot you choose on the map.기지를 원하는 위치로 옮기는 아이템.
- City도시
- A map building your alliance can capture. Season 1: Cities earn Alliance Influence (100K to 1M by level) and are taken through City Clash. Season 2: Cities produce most of your Rare Soil, 350 to 1,000 an hour by level, and an alliance can hold up to 6.연맹이 점령할 수 있는 맵 건물. 시즌1: 도시는 레벨에 따라 연맹 영향력 10만~100만을 주며, 도시 쟁탈전으로 점령합니다. 시즌2: 도시는 레벨에 따라 시간당 350~1,000의 신비한 광물을 생산하며, 연맹당 최대 6개입니다.
- Durability내구도
- A building's health bar in a battle. Season 1: a City's Durability must reach zero within the hour of a City Clash war to capture it. Season 2: attackers win by bringing the Alliance Furnace to 0%, and it does not refill during a battle.전투 중 건물의 내구도. 시즌1: 도시 쟁탈전 1시간 안에 도시 내구도를 0으로 만들면 점령합니다. 시즌2: 공격측은 연맹 용광로 내구도를 0%로 만들면 이기며, 전투 중에는 회복되지 않습니다.
- Contaminated LandContaminated Land
- Land where shields don't work. Season 1: the infected zone around the Capitol and other hot spots, where most cross-warzone fighting happens. Season 2: the Warlord Missile's blast area, for 1 hour after impact.보호막이 작동하지 않는 지역. 시즌1: 수도 주변 등 감염 지역으로, 대부분의 다른 전쟁구역 간 전투가 여기서 벌어집니다. 시즌2: 전쟁군주 미사일 폭발 범위가 착탄 후 1시간 동안 이렇게 됩니다.
- Rare Soil신비한 광물
- The resource Season 2 is built around. Cities produce it, and your alliance's total is stored in the Alliance Furnace.시즌2의 핵심 자원. 도시에서 생산되고 연맹 용광로에 쌓입니다.
- Alliance Furnace연맹 용광로
- Your alliance's main building in Season 2. It holds the alliance's Rare Soil, and it is the target in the Rare Soil War.시즌2 연맹의 핵심 건물. 신비한 광물을 보관하며 광물쟁탈전의 목표입니다.
- Dig Site채굴지 / 자원 요새
- A map building your alliance can capture. Dig Sites mainly produce Coal, plus a little Rare Soil (100 to 150 an hour by level). An alliance can hold up to 4.점령할 수 있는 건물. 주로 석탄과 약간의 신비한 광물(레벨별 시간당 100~150)을 생산합니다. 연맹당 최대 4개. 도시 목록의 석탄 탭에서는 "자원 요새"로 표시됩니다.
- Coal석탄
- Season 2 fuel. It keeps your base warm and pays for Titanium Alloy Factory upgrades.시즌2 연료. 기지 온도를 유지하고 티타늄 합금 공장 업그레이드에 쓰입니다.
- Bitterly Cold WaveBitterly Cold Wave
- Periodic blizzards that sharply drop the temperature across the whole map. On #2211 it hit -45°C (Lv.7) on Nov. 2.맵 전체 온도를 크게 떨어뜨리는 주기적인 눈보라. #2211에서는 11월 2일 -45°C(Lv.7)였습니다.
- High-heat FurnaceHigh-heat Furnace
- The heater in your own base in Season 2. It burns Coal to raise your base temperature, and upgrading it also raises Virus Resistance.시즌2 내 기지의 난방 건물. 석탄을 태워 기지 온도를 올리고, 업그레이드하면 바이러스 저항도 올라갑니다.
- OverdriveOverdrive
- The High-heat Furnace's strongest heat setting. A Level 30 furnace in Overdrive added +36°C on #2211. Guides say it burns about 4 times as much Coal as the normal setting.High-heat Furnace의 최대 난방 모드. #2211에서 30레벨 용광로 Overdrive로 +36°C였습니다. 가이드에 따르면 일반 설정보다 석탄을 약 4배 씁니다.
- FrozenFrozen
- What happens when a base stays below -20°C until the "Freezes in" countdown ends. A Frozen base can't relocate or start rallies; Alliance and random relocates still work. Warm up or have allies break the ice to thaw."Freezes in" 카운트다운이 끝날 때까지 -20°C 아래에 있으면 기지가 얼어붙습니다. 이전과 집결 시작이 불가능하며, 연맹 이전과 무작위 이전은 가능합니다. 온도를 올리거나 동맹이 얼음을 깨 주면 풀립니다.
- Thermal WeaponThermal Weapon
- A Season 2 temperature bonus: extra Troop Durability Damage when your base is warm, up to +500 at 40°C and above. Nothing at 0°C or colder.시즌2 온도 보너스. 기지가 따뜻할 때 부대의 내구도 피해가 늘어나며, 40°C 이상에서 최대 +500입니다. 0°C 이하에서는 없습니다.
- Nuclear FurnaceNuclear Furnace
- The big building at the center of the Season 2 map. After an alliance captures it, the warzone sends troops to restart it in the Reactivate the Nuclear Furnace event, while Glacieradons try to undo the progress. Restarting it sooner warms the warzone more.시즌2 맵 중앙의 큰 건물. 한 연맹이 점령하면 Reactivate the Nuclear Furnace 이벤트에서 전쟁구역이 병력을 보내 재가동하고, Glacieradon이 진행도를 되돌리려 합니다. 빨리 가동할수록 전쟁구역이 더 따뜻해집니다.
- GlacieradonGlacieradon
- The ice beast of Season 2. In Reactivate the Nuclear Furnace, four of them come one a day from the map corners, walk through Cities toward the Nuclear Furnace and slowly lower its activation progress. It stops to attack Cities that alliances hold; defending lowers its HP.시즌2의 얼음 야수. Reactivate the Nuclear Furnace 이벤트에서 하루 한 마리씩 총 4마리가 맵 모서리에서 나타나 도시를 거쳐 Nuclear Furnace로 이동하며 가동 진행도를 조금씩 깎습니다. 연맹이 보유한 도시에 멈춰 공격하며, 방어하면 HP가 줄어듭니다.
- Rare Soil War광물쟁탈전
- The Season 2 battles from Week 4 on. Alliances on opposite factions attack each other's Alliance Furnace to take Rare Soil.4주차부터 시작되는 시즌2 전투. 상대 진영 연맹의 용광로를 공격해 신비한 광물을 빼앗습니다.
- Faction: Rebels / Gendarmerie진영: 저항군 / 헌병대
- The two sides of the Rare Soil War. Each faction is a group of servers. You fight the other faction.광물쟁탈전의 두 편. 각 진영은 여러 서버로 이뤄지며 상대 진영과 싸웁니다.
- Plunder약탈
- The Rare Soil a winning attacker takes. Guides say up to 20% of the defender's total, based on damage done, rising to 30% after Week 6's Rare Soil Showdown.공격에 성공하면 가져오는 신비한 광물. 가이드에 따르면 피해량에 따라 최대 20%.
- Reinforce지원
- Sending a squad to help defend a building. Guides say up to 100 squads can reinforce an Alliance Furnace.건물 방어를 돕기 위해 부대를 보내는 것. 연맹 용광로에는 최대 100부대.
- Warlord전쟁군주
- An alliance title. The player holding it is the only one who can launch the Warlord Missile.연맹 직책. 이 직책을 가진 사람만 전쟁군주 미사일을 발사할 수 있습니다.
- Warlord Missile전쟁군주 미사일
- A once-per-battle strike on the enemy's Alliance Furnace. It hits after a 3-minute countdown and clears a 25 x 25 area.전투당 1회, 상대 연맹 용광로를 타격. 3분 뒤 명중하며 25 x 25 범위를 비웁니다.
- March time출정시간
- How long your squad takes to reach a target. It shows on the March button before you send.부대가 목표까지 가는 데 걸리는 시간. 출정 버튼에 표시됩니다.
- Target markTarget 마크
- A marker leadership puts on an enemy building, with a countdown everyone can see. Used to time attacks.리더십이 목표에 거는 표시. 모두가 보는 카운트다운이 함께 나옵니다.
- Timed attack (ToT)타이머 공격 (ToT)
- Every squad lands on the target at the same moment. Players also call it ToT, short for Time on Target. A player term, not a game menu.모든 부대가 같은 순간에 목표에 도착하는 공격. ToT(Time on Target)라고도 부릅니다.
Share it with anyone who needs it. Spot something wrong or out of date? Tell me here or in game and I'll fix it.
필요한 분께 자유롭게 공유하세요. 틀리거나 바뀐 내용이 있으면 여기나 게임에서 알려주세요. 바로 고치겠습니다.